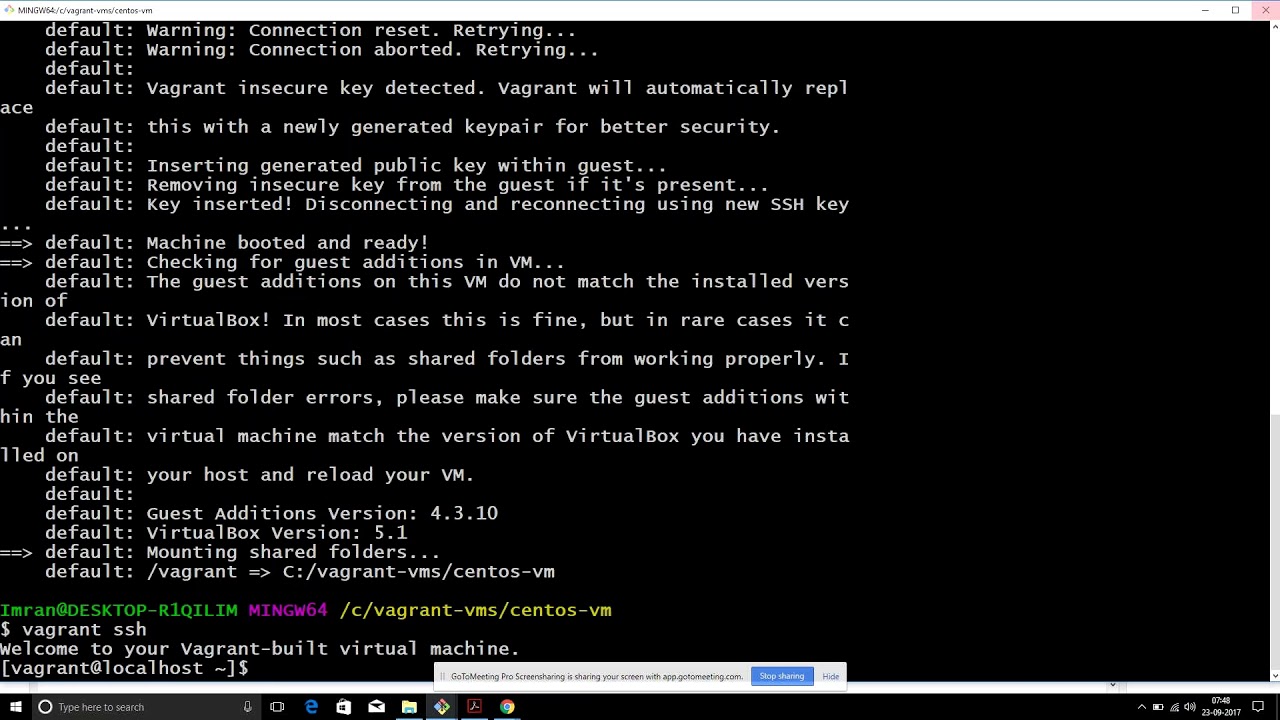
Basic Linux Part1 Vagrant DEVOPS ONLINE TRAINING
July 18, 2026 — LiveStream
🛒 Recommended gear on AmazonDisclosure: some links above are affiliate links — if you buy through them I may earn a small commission at no extra cost to you. Thanks for supporting the channel!
As an Amazon Associate I earn from qualifying purchases.
Mastering Basic Linux for DevOps is non-negotiable for anyone aspiring to excel in the field, and **Vagrant** emerges as an indispensable tool for effortlessly setting up local development environments. This comprehensive guide delves into getting started with **Vagrant for DevOps online training**, meticulously covering essential Linux commands and environment setup to build a robust foundation.
In the fast-paced world of technology, where every second counts and reliability is paramount, a solid understanding of Linux isn't just a skill—it's your superpower. As a DevOps engineer, you're constantly interacting with servers, deploying applications, and orchestrating complex systems, nearly all of which run on Linux. And to make this journey smooth and reproducible, we have tools like Vagrant. Imagine you're just starting out, or even if you're a seasoned pro trying a new setup; you need a consistent, clean environment to experiment, learn, and develop without messing up your main system. That's exactly where **Vagrant DevOps training** becomes your best friend, allowing you to spin up virtual machines (VMs) with the precise configurations you need, almost like magic. So, grab your chai, let's dive deep into setting up your very own Linux playground using Vagrant, learning the fundamental commands that are the bread and butter of every DevOps professional.
Why Linux is the Backbone of DevOps (and Why Vagrant is Your Best Friend)
Bhaiya, if you're in DevOps, then Linux is your second language, pakka. Seriously, it's everywhere. From tiny Raspberry Pis running your home automation to massive cloud servers powering global enterprises, Linux is the operating system of choice. Why? Because it's open-source, incredibly stable, secure, and offers unparalleled flexibility. When you're managing containers with Docker or Kubernetes, orchestrating deployments, or even just writing automation scripts, you'll be doing it on a Linux-based system. Understanding its file system, permissions, and command-line interface (CLI) isn't just a "nice-to-have"; it's the fundamental skill set that separates a good DevOps engineer from someone just dabbling.
Now, while learning Linux is crucial, setting up a proper environment to practice can sometimes be a headache. You might think, "Why not just install a VM directly with VirtualBox or VMware?" Good question! And sure, you could. But imagine doing that every time you need a new environment, or sharing that environment setup with a teammate. It involves manual clicks, specific ISO files, and a whole lot of "it works on my machine" moments. This is where **Vagrant** waltzes in like a hero, making environment setup as easy as brewing your morning coffee.
Vagrant, from HashiCorp, is an open-source tool that lets you create and manage portable virtual development environments. Think of it as "Infrastructure as Code lite" for your local machine. Instead of manually configuring a VM, you describe your desired environment (OS, memory, network, software provisioning) in a simple text file called a Vagrantfile. Then, with a single command, Vagrant automatically spins up that VM, installs the OS, configures network settings, and even runs initial provisioning scripts. This means:
- Reproducibility: Everyone on your team gets the exact same environment, eliminating "it works on my machine" excuses.
- Portability: Your
Vagrantfile can be shared and run on different host operating systems (Windows, macOS, Linux) with various virtualization providers (VirtualBox, VMware, Hyper-V).
- Speed: Spin up and tear down environments in minutes, not hours.
- Clean Slate: Experiment fearlessly! If you mess up, just
vagrant destroy and vagrant up again for a fresh start.
- Focus on Learning: Less time configuring, more time learning actual Linux commands and DevOps tools.
Vagrant removes the friction from environment setup, letting you focus on the core task: mastering **Basic Linux for DevOps** without any setup woes. It's like having a personal chaiwala who knows exactly how you like your VM—ekdum ready and piping hot!
Getting Started with Vagrant: Your First DevOps Environment
Alright, let's roll up our sleeves and get our hands dirty. The first step in your **DevOps online training** journey with Vagrant is to set up the necessary tools. This is pretty straightforward, I promise.
Prerequisites: The Essential Tools
Before you can use Vagrant, you need a "provider" for your virtual machines. Think of the provider as the engine that actually runs the VMs. The most common and free choice is **VirtualBox**. So, make sure you have these installed:
- VirtualBox: Download and install the latest version from virtualbox.org. Make sure you also install the VirtualBox Extension Pack.
- Vagrant: Download the installer for your operating system (Windows, macOS, or Linux) from vagrantup.com/downloads. Follow the installation prompts, which are typically "next, next, finish."
Once installed, open your terminal (Command Prompt/PowerShell on Windows, Terminal on macOS/Linux) and verify the installations:
vagrant --version
vboxmanage --version # (or just 'virtualbox' to open the GUI)
If you see version numbers, you're good to go!
Initializing Your First VM: The Vagrantfile Magic
Now for the fun part! Let's create our first Vagrant-managed VM. We'll start with a common and lightweight Linux distribution, like Ubuntu Bionic64.
- Create a Project Directory: It's good practice to keep your Vagrant projects organized.
mkdir my-first-vagrant-vm
cd my-first-vagrant-vm
- Initialize Vagrant: This command creates a
Vagrantfile in your current directory.
vagrant init hashicorp/bionic64
What just happened? Vagrant looked for a "box" named hashicorp/bionic64. A "box" is essentially a pre-packaged VM image. If it's not found locally, Vagrant will download it from Vagrant Cloud. The Vagrantfile is your blueprint for this VM.
- Examine the
Vagrantfile: Open the newly created Vagrantfile with your favourite text editor. You'll see a lot of commented-out lines, but the core part looks like this:
Vagrant.configure("2") do |config|
  config.vm.box = "hashicorp/bionic64"
  # Other configurations will go here
end
This line config.vm.box = "hashicorp/bionic64" tells Vagrant which base image to use. You can uncomment and modify other settings like CPU, memory, network, and synced folders. For example, to give your VM 1GB of RAM:
Vagrant.configure("2") do |config|
  config.vm.box = "hashicorp/bionic64"
  config.vm.provider "virtualbox" do |vb|
    vb.memory = "1024" # 1GB RAM
    vb.cpus = "1"      # 1 CPU core
  end
end
- Spin Up the VM: This is the moment of truth!
vagrant up
Vagrant will now:
- Download the `hashicorp/bionic64` box if it's not already on your system.
- Import the box into VirtualBox.
- Start the VM.
- Configure network settings (by default, it sets up a private network for SSH access).
This process might take a few minutes the first time, depending on your internet speed. Once it's done, you have a fully functional Ubuntu VM running in the background!
- Connect to Your VM via SSH: Now that your VM is running, you can connect to it using SSH (Secure Shell). Vagrant automatically handles the SSH key management for you.
vagrant ssh
Voila! You are now inside your Linux VM. Your prompt will change, typically showing something like vagrant@bionic64:~ $. Congratulations, you've just stepped into your **Basic Linux Part1** playground!
Basic Vagrant Commands: Managing Your Environments
Knowing how to control your Vagrant VMs is crucial for effective **DevOps online training**. Here are the most common commands you'll use:
vagrant status: Shows the current state of your Vagrant machine (e.g., running, powered off, saved).vagrant suspend: Pauses the running VM, saving its current state to disk. It's like putting your laptop to sleep; it resumes very quickly.vagrant halt: Gracefully shuts down the VM. It's like a proper shutdown; the VM will need to boot up again, which takes a bit longer than resuming from suspend.vagrant destroy: Permanently deletes everything related to the VM (its disk image, state, etc.). Use this when you're done with an environment and want a clean slate.vagrant reload: Restarts the Vagrant machine and re-reads the Vagrantfile. Useful after making changes to network settings or other VM configurations.vagrant provision: Runs the provisioners defined in your Vagrantfile (e.g., shell scripts, Ansible playbooks) without restarting the VM. This is handy for applying configuration changes.vagrant up --provision: Boots up the VM and then runs the provisioners.
These commands give you full control over your development environments, making your **Linux fundamentals for DevOps** learning experience smooth and efficient.
Navigating Your Linux Playground: Essential Commands for DevOps
Now that you're inside your freshly brewed Vagrant VM, it's time to get comfortable with the Linux command line. These are the commands that every DevOps engineer uses, practically every single day. Master these, and you'll be well on your way to becoming a Linux pro, yaara.
File System Navigation: Finding Your Way Around
The Linux file system is organized like a tree. Understanding how to move around is step one.
pwd (Print Working Directory): Ever lost your way? This command tells you exactly where you are in the file system.
vagrant@bionic64:~$ pwd
/home/vagrant
ls (List): Lists files and directories in the current directory.
ls -l: Long listing format, showing permissions, owner, group, size, date, etc.ls -a: Shows all files, including hidden ones (those starting with a .).ls -F: Appends a symbol to entries (/ for directories, * for executables, @ for symlinks).
vagrant@bionic64:~$ ls -laF
total 40
drwxr-xr-x  6 vagrant vagrant 4096 Apr  5 10:30 ./
drwxr-xr-x  3 root    root    4096 Apr  5 10:29 ../
-rw-------  1 vagrant vagrant 2486 Apr  5 10:30 .bash_history
-rw-r--r--  1 vagrant vagrant  220 Apr  5 10:29 .bash_logout
drwxr-xr-x  3 vagrant vagrant 4096 Apr  5 10:30 .cache/
drwxrwxr-x  2 vagrant vagrant 4096 Apr  5 10:30 .ssh/
-rw-r--r--  1 vagrant vagrant  807 Apr  5 10:29 .profile
cd (Change Directory): Moves you to a different directory.
cd ..: Go up one directory level.cd ~: Go to your home directory (usually /home/your_username).cd /: Go to the root directory.cd /var/log: Go to a specific absolute path.
vagrant@bionic64:~$ cd /var/log
vagrant@bionic64:/var/log$ pwd
/var/log
File & Directory Management: Creating, Copying, Moving, Deleting
These commands are your daily bread-and-butter for handling files and folders.
mkdir (Make Directory): Creates new directories.
mkdir my_project: Creates a directory named my_project.mkdir -p project/src/main: Creates parent directories if they don't exist.
vagrant@bionic64:~$ mkdir my_project
vagrant@bionic64:~$ ls
my_project
touch: Creates an empty file or updates the timestamp of an existing file.vagrant@bionic64:~$ touch my_project/app.py
vagrant@bionic64:~$ ls my_project/
app.py
cp (Copy): Copies files or directories.
cp file1 file2: Copies file1 to file2 (same directory).cp file1 /tmp/: Copies file1 to the /tmp directory.cp -r dir1 dir2: Recursively copies dir1 and its contents to dir2.
vagrant@bionic64:~$ cp my_project/app.py my_project/backup_app.py
vagrant@bionic64:~$ ls my_project/
app.py  backup_app.py
mv (Move/Rename): Moves files/directories or renames them.
mv old_name.txt new_name.txt: Renames old_name.txt to new_name.txt.mv file.txt /another/directory/: Moves file.txt to a different directory.
vagrant@bionic64:~$ mv my_project/backup_app.py my_project/app_old.py
vagrant@bionic64:~$ ls my_project/
app_old.py  app.py
rm (Remove): Deletes files or directories. Be extremely careful with this command, especially with -rf!
rm file.txt: Deletes file.txt.rm -r directory/: Recursively deletes an empty directory.rm -rf directory/: Recursively and forcefully deletes a directory and its contents without prompting. Use this ONLY if you are 100% sure what you're doing. There's no undo!
vagrant@bionic64:~$ rm my_project/app_old.py
vagrant@bionic64:~$ ls my_project/
app.py
Viewing File Content: Peeking Inside Files
Sometimes you just need to see what's in a file without opening a full editor.
cat (Concatenate): Displays the entire content of a file to the terminal. Useful for small files.less / more: Paginates content, allowing you to scroll through large files page by page. less is generally preferred as it allows both forward and backward scrolling.head: Shows the first few lines (default 10) of a file. head -n 5 file.txt for the first 5 lines.tail: Shows the last few lines (default 10) of a file. Useful for log files. tail -f file.log will "follow" the file, showing new lines as they are added.
Permissions & Ownership: The Linux Security Model
Linux security is built around permissions. Every file and directory has permissions that dictate who can read, write, or execute it.
chmod (Change Mode): Changes file permissions. This uses either numeric (octal) or symbolic modes.
# Give owner read/write/execute, group read/execute, others read/execute
vagrant@bionic64:~$ chmod 755 script.sh

# Add execute permission for the owner
vagrant@bionic64:~$ chmod u+x script.sh
chown (Change Owner): Changes the owner and/or group of a file or directory.# Change owner to 'john' and group to 'devs'
vagrant@bionic64:~$ sudo chown john:devs file.txt
sudo (Super User Do): Executes a command with root (administrator) privileges. This is crucial for installing software, modifying system files, and managing services. Always use `sudo` with caution and only when necessary!vagrant@bionic64:~$ sudo apt update
Package Management: Installing Software
As a DevOps engineer, you'll constantly be installing software. Package managers make this process a breeze.
- For Debian/Ubuntu-based systems (like our Bionic64 box), we use
apt.
sudo apt update: Refreshes the list of available packages from repositories. Do this before installing anything!sudo apt upgrade: Upgrades all installed packages to their latest versions.sudo apt install : Installs a specific package (e.g., sudo apt install nginx).sudo apt remove : Uninstalls a package.
vagrant@bionic64:~$ sudo apt update
vagrant@bionic64:~$ sudo apt install net-tools # for ifconfig, etc.
- For Red Hat/CentOS-based systems, you'd use
yum or dnf. The commands are similar (yum install ).
These commands are the basic building blocks for any task you'll perform on a Linux server. Practice them till they're muscle memory. For a deeper dive into the Linux file system hierarchy, you can refer to our article on Linux Filesystem Basics.
Advancing Your Vagrant Game & Troubleshooting Tips
Once you're comfortable with the basics of spinning up a VM and navigating Linux, it's time to supercharge your Vagrant setups. This will make your local **DevOps training** environments even more powerful and representative of real-world scenarios.
Network Configuration in Vagrantfile: Connecting Your VMs
By default, Vagrant sets up a NAT network for your VM to access the internet and a private host-only network for SSH. But you often need more control:
- Private Networks (Host-Only): These allow communication between your host machine and your Vagrant VM, or between multiple Vagrant VMs on the same host, using a fixed IP address. This is perfect for setting up multi-VM environments (e.g., a web server and a database server).
config.vm.network "private_network", ip: "192.168.33.10"
Now, from your host, you can ping 192.168.33.10, and from your VM, you can be accessed via that IP.
- Public Networks (Bridged): This connects your VM directly to your host's physical network interface. Your VM will get an IP address from your router, just like another physical device on your network. Useful if you need your VM to be directly accessible from other machines on your LAN.
config.vm.network "public_network"
Vagrant will prompt you to choose a network interface if you have multiple. You can specify it directly: config.vm.network "public_network", bridge: "en0: Wi-Fi (AirPort)" (macOS example).
- Port Forwarding: This allows you to access a specific port on your VM from a port on your host machine. For example, if your VM runs a web server on port 80, you can forward it to port 8080 on your host.
config.vm.network "forwarded_port", guest: 80, host: 8080
Now, visiting http://localhost:8080 on your host will show the web server running inside your Vagrant VM.
Remember to run vagrant reload after making network changes to your Vagrantfile for them to take effect.
Provisioning: Automating VM Setup
The real power of Vagrant for **DevOps online training** comes from provisioning. This is how you automate the installation and configuration of software inside your VM once it's up and running. Vagrant supports various provisioners:
- Shell Scripts: The simplest form. You can point Vagrant to a shell script that runs commands inside the VM.
config.vm.provision "shell", path: "bootstrap.sh"
And your bootstrap.sh might look like:
#!/bin/bash
sudo apt update
sudo apt install -y nginx
sudo systemctl enable nginx
sudo systemctl start nginx
echo "Hello from Vagrant!" | sudo tee /var/www/html/index.nginx-debian.html
- Configuration Management Tools: For more complex setups, Vagrant integrates with tools like Ansible, Puppet, Chef, and SaltStack. This allows you to apply industry-standard configuration management to your local VMs, a critical skill for any DevOps engineer.
# Example for Ansible
config.vm.provision "ansible" do |ansible|
  ansible.playbook = "playbook.yml"
end
This is where your learning path naturally extends towards Infrastructure as Code with Ansible.
After modifying your provisioning, run vagrant provision to apply the changes without restarting the VM, or vagrant reload --provision to restart and re-run everything.
Synced Folders: Seamless Host-Guest File Sharing
Working on your code on your host machine and having it immediately available in your VM is super convenient. Vagrant's synced folders make this possible. By default, the directory containing your Vagrantfile is synced to /vagrant inside the VM.
# Default synced folder (host project dir -> /vagrant in guest)
config.vm.synced_folder ".", "/vagrant"

# Custom synced folder
config.vm.synced_folder "data", "/home/vagrant/data"
Now, any files you put in the data directory on your host machine will appear in /home/vagrant/data inside your VM, and vice-versa.
Common Pitfalls and Solutions: Troubleshooting Like a Pro
Even with tools like Vagrant, you'll encounter issues. Being able to troubleshoot is a key DevOps skill.
- "The box 'xyz' could not be found."
- Solution: Double-check the box name for typos. Ensure you have an active internet connection if it's the first time using that box. You might need to add it manually:
vagrant box add hashicorp/bionic64.
- Networking Issues (e.g., cannot SSH, IP not reachable).
- Solution:
- Check your host machine's firewall.
- Ensure VirtualBox Host-Only Network Adapter is enabled and configured correctly (check VirtualBox preferences).
- Verify IP addresses in your
Vagrantfile are not conflicting with other devices on your network.
- Run
vagrant reload --provision to apply network changes.
- Permission Denied Errors (inside VM).
- Solution: Most likely, you're trying to perform an action that requires root privileges. Prefix your command with
sudo (e.g., sudo apt update). Be careful with permissions on synced folders; sometimes setting `owner` and `group` options in `synced_folder` might be needed.
- VM Running Slow / Resource Starvation.
- Solution: Increase memory (
vb.memory) and CPU (vb.cpus) allocations in your Vagrantfile. Ensure your host machine has enough resources.
- Provisioning Scripts Not Running / Errors During Provisioning.
- Solution:
- Run
vagrant provision to re-run only the provisioners.
- For shell scripts, ensure they have execute permissions (
chmod +x script.sh) and correct shebang (#!/bin/bash).
- Check the output for errors carefully. Vagrant's output is usually quite verbose.
- Debugging with
vagrant up --debug.
- Solution: If you're really stuck, this command provides an enormous amount of output, which can sometimes pinpoint the exact issue.
Troubleshooting is an art, and the more you practice with your **Vagrant DevOps training** environments, the better you'll become at it. Don't be afraid to experiment, break things, and fix them. That's how we learn, isn't it?
By leveraging Vagrant's advanced features, you can create complex, multi-tiered application environments right on your local machine, giving you invaluable practical experience for real-world DevOps scenarios. It's truly a big deal for anyone looking to solidify their **Linux fundamentals for DevOps**.
Key Takeaways
- Linux is Fundamental for DevOps: A deep understanding of Linux commands, file systems, and permissions is the bedrock upon which all advanced DevOps skills are built.
- Vagrant Simplifies Local Development Environments: It automates the creation, configuration, and management of virtual machines, ensuring consistency, reproducibility, and portability across different systems and teams.
- Mastering Core Linux Commands is Essential: Commands like
cd, ls, mkdir, cp, mv, rm, sudo, and package managers (apt/yum) are daily tools for any DevOps engineer.
- Vagrantfile Enables Infrastructure as Code Locally: Defining your VM's specifications (OS, resources, network, provisioning) in a single, version-controlled file brings IaC principles to your local setup.
- Troubleshooting Skills are Crucial: Encountering and resolving issues with Vagrant, network configurations, or Linux commands hones your problem-solving abilities, an invaluable asset in the DevOps landscape.
Frequently Asked Questions
Why choose Vagrant over just installing Linux on a VM directly with VirtualBox?
Vagrant offers significant advantages over direct VM installation, primarily automation, reproducibility, and portability. With a Vagrantfile, you define your entire environment as code, meaning you can spin up the exact same VM configuration repeatedly, easily share it with teammates, and destroy it without a trace. This "Infrastructure as Code" approach simplifies environment setup and maintenance, making it perfect for rapid prototyping, development, and **DevOps training**.
What's the difference between vagrant suspend, halt, and destroy?
These commands control the lifecycle of your Vagrant VM. vagrant suspend pauses the VM, saving its current state to disk, allowing for a quick resume. vagrant halt performs a graceful shutdown of the VM, powering it off completely. vagrant destroy is the most drastic; it permanently deletes the VM and all its associated disk images and data, giving you a clean slate.
How important is sudo in Linux for DevOps?
sudo (Super User Do) is extremely important. It allows a regular user to execute commands with root (administrator) privileges, which is essential for performing system-level tasks such as installing software, modifying system configuration files, starting/stopping services, and managing users. However, it should be used judiciously, as commands executed with sudo have the potential to make significant, system-wide changes.
Can I use Vagrant with other virtualization providers besides VirtualBox?
Yes, absolutely! While VirtualBox is the most common and free provider for Vagrant, it supports many others through plugins. You can configure Vagrant to work with VMware (Workstation/Fusion), Hyper-V (on Windows), Docker, and even cloud providers like AWS and Azure. This flexibility makes Vagrant a versatile tool for managing development environments across various platforms.
Ready to see these concepts in action? Make sure to watch the full practical walkthrough of "Basic Linux Part1 Vagrant DEVOPS ONLINE TRAINING" on the @explorenystream channel. Don't forget to subscribe for more in-depth DevOps tutorials and continue your learning journey with our expert guidance!