
🖥️ How to Install RedHat Enterprise Linux 7 on VMware Workstation | Step-by-Step Guide
July 25, 2026 — LiveStream
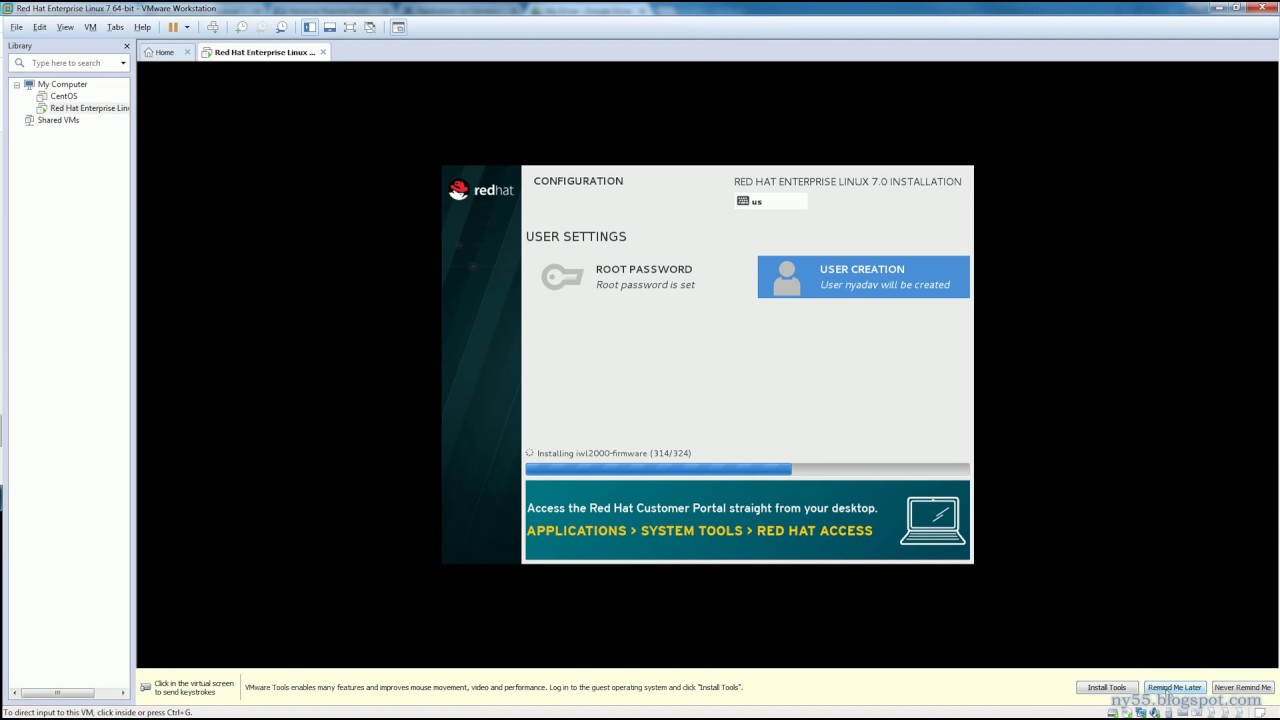
▶ 🖥️ How to Install RedHat Enterprise Linux 7 on VMware Workstation | Step-by-Step Guide | Subscribe to @explorenystream
Planning to build a robust local development environment or test some legacy applications? Or perhaps you're simply honing your Linux administration skills on a stable, enterprise-grade platform? Then knowing how to install RedHat Enterprise Linux 7 on VMware Workstation is a crucial skill, especially for any aspiring or seasoned DevOps engineer. This comprehensive guide will walk you through the entire process, step-by-step, making sure you set up your RHEL 7 virtual machine correctly, efficiently, and ready for action.
In today's fast-paced tech world, having a reliable local sandbox is paramount. Whether it's for experimenting with automation scripts, testing application compatibility, or just learning the ropes of a Red Hat system, a properly configured RHEL 7 VM on VMware Workstation gives you that isolated, powerful environment. So, grab your chai, yaar, and let's get this done, from creating the virtual machine to the essential post-installation tweaks.
The Why and What: Setting the Stage for RHEL 7 on VMware Workstation
"Dekho, why RHEL 7, you ask, when newer versions are out? Simple. RHEL 7, while not the absolute latest, is still a powerhouse in many enterprise environments. It’s stable, mature, and many critical applications and legacy systems are built on it. Plus, if you're working towards certain certifications or need to support older infrastructure, mastering RHEL 7 is non-negotiable."
For a DevOps professional, understanding different Linux distributions and their nuances is like knowing multiple programming languages. RHEL, with its robust package management (YUM) and enterprise-grade security features, provides a solid foundation. And why VMware Workstation? Because it's arguably the most user-friendly and feature-rich desktop virtualization solution out there. It allows you to run multiple operating systems on a single physical machine, completely isolated from your host, without needing a dedicated server. This makes it perfect for testing, development, and creating isolated lab environments right on your laptop or desktop.
What You'll Need Before We Start Our RHEL 7 Installation Journey
Before we dive into the actual installation of RedHat Enterprise Linux 7 on VMware Workstation, make sure you have a few things sorted:
- VMware Workstation Pro: Make sure you have it installed on your host machine (Windows, Linux, or macOS).
- Red Hat Enterprise Linux 7 ISO Image: You'll need the installation media. You can usually download this from the Red Hat Developer Program (a free subscription is often available for development purposes).
- Sufficient System Resources: Your host machine needs enough RAM, CPU, and disk space to comfortably run RHEL 7 alongside your host OS. For RHEL 7, I'd recommend at least 2GB RAM and 2 CPU cores for the VM itself, and at least 20-30GB of disk space.
- Internet Connection: Essential for downloading updates and installing additional packages post-installation.
"Got all that? Acha, then let's begin the exciting part: setting up our virtual playground!"
Creating Your Virtual Machine: The VMware Workstation Side
The first step in our quest to install RedHat Enterprise Linux 7 on VMware Workstation is to create the virtual hardware that RHEL 7 will run on. Think of it like assembling a new computer, but entirely in software.
- Open VMware Workstation Pro: Launch the application.
- Create a New Virtual Machine:
Go to
File > New Virtual Machine...or click on the "Create a New Virtual Machine" link on the home screen. This will open the New Virtual Machine Wizard.- Choose Installation Type: Select "Typical (recommended)" for a straightforward setup. If you're an experienced user and want more granular control, "Custom (advanced)" is also an option. For this guide, Typical is fine. Click "Next".
- Installer Disc Image: This is where you point to your RHEL 7 ISO.
- Select "Installer disc image file (iso):"
- Click "Browse..." and navigate to the location where you saved your RHEL 7 ISO image.
- Once selected, VMware Workstation is usually smart enough to detect that it's a Red Hat Linux system. Click "Next".
- Linux Version Information:
- VMware will prompt you for a "Full name," "User name," and "Password." You can fill these in here to let VMware automatically install RHEL, or leave them blank and choose to "Install operating system later." For greater control and to follow the manual installation steps, I recommend choosing "Install operating system later." This will make sure you don't miss any critical steps of the RHEL 7 installer itself.
- If you choose "Install operating system later," you'll then be asked to select the Guest operating system. Choose "Linux" and then "Red Hat Enterprise Linux 7 64-bit" from the dropdown. Click "Next".
- Name the Virtual Machine:
- Give your virtual machine a descriptive name, something like "RHEL7-DevOps-Lab" or "MyRHEL7VM." This helps you identify it later, especially if you have multiple VMs.
- Choose the "Location" where the VM files will be stored. By default, it's usually in your Documents folder under "Virtual Machines," but you can change it to a drive with more space if needed. Click "Next".
- Specify Disk Capacity:
- "Yaar, this is important." For RHEL 7, I'd recommend a minimum of 20GB, but if you plan to install a lot of software, tools, or applications, go for 30-40GB. Remember, this is the maximum size the virtual disk can grow to; it doesn't immediately consume all that space if you select "Store virtual disk as a single file" or "Split virtual disk into multiple files."
- The default "Split virtual disk into multiple files" is generally fine for portability, but "Store virtual disk as a single file" can offer slightly better performance on some systems. Choose what suits your needs. Click "Next".
- Customize Hardware (Optional but Recommended):
- On the "Ready to Create Virtual Machine" screen, instead of clicking "Finish," click "Customize Hardware." This is where you fine-tune your VM's specs.
- Memory (RAM): Increase this to at least 2048 MB (2GB). If your host has plenty of RAM (16GB+), you can even allocate 4GB or more for better performance, especially if you plan to run a GUI.
- Processors: Allocate at least 2 processor cores. This significantly speeds up operations within the VM.
- Network Adapter:
- NAT (Network Address Translation): This is the default and usually sufficient for most lab setups. Your VM gets an IP address from VMware's internal DHCP server, and it can access the internet through your host's connection. It's isolated from your physical network but can talk to the outside world.
- Bridged: If you want your RHEL 7 VM to appear as a separate, full-fledged device on your physical network (getting an IP from your physical router, for example), choose Bridged. This is useful if you want other physical machines on your network to directly access services running on your VM.
- Host-only: This creates a private network between your host and the VM only. The VM cannot access the internet. Useful for extremely isolated testing.
For most DevOps learning and testing, NAT is a good starting point.
- Display: You can leave this as default.
- Make sure your RHEL 7 ISO is still connected under "New CD/DVD (SATA)" and "Connect at power on" is checked.
- Click "Close" to exit the hardware customization window, then "Finish" to create the VM.
Now, your virtual machine skeleton is ready. Time to put the brains (RHEL 7) into it!
The RHEL 7 Installation Journey: Inside the Installer
"Chalo, now for the main course! This is where we actually install RedHat Enterprise Linux 7 on VMware Workstation. Pay close attention to these steps, as getting them right ensures a smooth system."
- Power On the Virtual Machine:
In VMware Workstation, select your newly created RHEL 7 VM from the library and click "Power on this virtual machine." The VM will boot and detect the attached RHEL 7 ISO image.
- Boot from ISO:
You'll see a boot menu. Select "Install Red Hat Enterprise Linux 7.0" (or whichever minor version you have) and press Enter. The installer will load.
- Language and Keyboard Selection:
Choose your preferred language for the installation process and keyboard layout. Click "Continue".
- Installation Summary (Anacondaa Installer):
This screen is your central hub for configuring RHEL 7. We'll go through each section.
- DATE & TIME:
- Click on "Date & Time." Select your geographical region and city. This will automatically set your timezone. Make sure "Network Time" is ON for NTP synchronization. Click "Done."
- KEYBOARD:
- Verify your keyboard layout. If you need to add or remove layouts, do it here. Click "Done."
- LANGUAGE SUPPORT:
- Confirm your primary language. Add additional languages if necessary. Click "Done."
- INSTALLATION SOURCE:
- It should automatically detect "Local Media" (your ISO). No changes needed here. Click "Done."
- SOFTWARE SELECTION:
- This is a crucial decision for a DevOps environment.
- Minimal Install: The lightest option, providing a command-line interface (CLI) with essential tools. This is often preferred for server environments because it consumes fewer resources and has a smaller attack surface. For a DevOps lab where you'll mainly use SSH, this is a great choice.
- Server with GUI: Installs a desktop environment (GNOME) alongside server components. Good if you prefer a graphical interface for initial setup or specific tasks, but it's resource-intensive.
- Infrastructure Server / Development and Creative Workstation: These options include more pre-selected packages that might be useful, but often lead to a "bloated" system if you only need specific tools.
- For our purposes, I recommend starting with "Minimal Install." You can always add packages later using
yum. On the right panel, you can choose "Add-ons" like "Development Tools" which are super useful for compiling software. Select "Development Tools" if you chose Minimal Install. Click "Done."
- INSTALLATION DESTINATION (Disk Partitioning):
- Click on "Installation Destination." Here, you'll configure your virtual disk.
- Select the virtual disk you created (e.g., "VMware Virtual disk").
- Automatic Partitioning: For most lab setups, select "Automatically configure partitioning." This is the easiest route, and the installer will create standard partitions like
/boot,/(root), andswapfor you. - Manual Partitioning (Advanced): If you need more control (e.g., separate partitions for
/var,/home, or use LVM - Logical Volume Management), choose "I will configure partitioning." This allows you to create custom mount points, sizes, and file systems.- "Toh, if you go manual, yaar, at least create these basic partitions:"
/boot(Standard Partition, ext4, ~500MB-1GB)swap(Standard Partition, swap, 2GB or 2x your RAM up to 8GB for older kernels)/(LVM, ext4, remaining space)
- "Toh, if you go manual, yaar, at least create these basic partitions:"
- Once configured (either automatically or manually), click "Done." If you manually partitioned, accept the changes by clicking "Accept Changes" in the summary window.
- NETWORK & HOSTNAME:
- Click on "Network & Hostname."
- On the left panel, select your Ethernet adapter (e.g.,
ens33oreth0). - Toggle the "ON/OFF" switch to "ON" to activate the network adapter. By default, it will try to get an IP address via DHCP.
- Set a "Hostname" for your VM at the bottom (e.g.,
rhel7-dev.local). - For advanced settings like static IP configuration, click "Configure..." and go to the "IPv4 Settings" tab. Select "Manual" method, add your address, netmask, gateway, and DNS servers. For a lab environment with NAT, DHCP is usually fine.
- Click "Done."
- SECURITY POLICY:
- For a lab environment, you can leave this as "No security policy applied." For production systems, you might enable a SCAP profile. Click "Done."
- KDUMP:
- Leave Kdump enabled as default. It's useful for kernel crash debugging. Click "Done."
- DATE & TIME:
- Begin Installation:
Once all sections are configured, click "Begin Installation."
- ROOT PASSWORD & USER CREATION:
While the installation proceeds, you'll see two new options at the bottom of the screen:
- ROOT PASSWORD: Click this and set a strong password for the
rootuser. This is critical for administrative access. Do NOT forget this password! - USER CREATION: Create a regular user account. Provide a full name, username, and a strong password. You can also check "Make this user administrator" if you want this user to have
sudoprivileges (highly recommended for daily use instead of logging in as root).
Once these are set, wait for the installation to complete. This can take some time, depending on your system resources and software selection.
- ROOT PASSWORD: Click this and set a strong password for the
- Reboot:
After the installation finishes, a "Complete" message will appear. Click "Reboot" to restart your virtual machine. Make sure to "disconnect" the ISO image from the VM settings or it might try to boot into the installer again. VMware usually handles this automatically on reboot, but it's good to know.
Post-Installation Essentials: Making Your RHEL 7 VM Production-Ready
"Badhiya! Your RHEL 7 is installed. But humara kaam abhi khatam nahi hua hai, bhai. There are a few crucial steps to make this VM truly usable and efficient for your DevOps work."
- Initial Login and EULA Acceptance:
After rebooting, RHEL 7 will boot up. If you installed a GUI, you'll see a login screen. If it was a Minimal Install, you'll get a command prompt. Login with the user you created or as
root. The first time you log in, you might be prompted to accept the End User License Agreement (EULA). Type1to accept and then2to finish. - Registering RHEL (Optional for Lab, Mandatory for Updates):
If you downloaded RHEL from the Red Hat Developer program, you might need to register your system to get updates. This usually involves:
sudo subscription-manager register --username your_redhat_username --password your_redhat_password --auto-attachIf you're just learning and don't need official updates, or if you're using a free developer license, you might skip this for a purely local, isolated lab. However, for a fully functional system that can get security patches and new packages, registration is key.
- Update Your System:
This is paramount. As soon as you have network connectivity, update all installed packages to their latest versions:
sudo yum update -yThis command downloads and installs all available security patches and bug fixes. A reboot might be recommended after a major kernel update.
- Install VMware Tools:
"Yaar, this is the most common pitfall people miss! VMware Tools are essential for optimal performance, better display resolution, shared folders, drag-and-drop functionality, and seamless mouse integration."
- From the VMware Workstation menu, go to
VM > Install VMware Tools.... This will mount a virtual CD-ROM containing the VMware Tools installer onto your RHEL 7 VM. - Inside your RHEL 7 VM, open a terminal (if on GUI) or just proceed from the CLI.
- Mount the virtual CD-ROM:
                sudo mkdir /mnt/cdrom

sudo mount /dev/cdrom /mnt/cdrom - Copy the installer to a temporary directory:
tar xvfz /mnt/cdrom/VMwareTools-*.tar.gz -C /tmp - Unmount the CD-ROM:
sudo umount /mnt/cdrom - Navigate to the extracted directory and run the installer:
                cd /tmp/vmware-tools-distrib

                sudo ./vmware-install.pl -d
The
-dflag accepts all default options. Just hit Enter through the prompts. Once completed, reboot your VM:sudo rebootAfter rebooting, you should notice a significant improvement in responsiveness, and your mouse pointer will move smoothly between your host and guest OS. Also, if you resize the VM window, the guest OS resolution should adjust automatically.
- From the VMware Workstation menu, go to
- Network Verification and SSH Setup:
Verify your network connectivity:
        ip a

        ping google.com
If you plan to manage your RHEL 7 VM remotely (which is standard practice in DevOps), ensure SSH is installed and running:
        sudo yum install openssh-server -y

        sudo systemctl enable sshd

        sudo systemctl start sshd
Also, make sure the firewall allows SSH traffic:
        sudo firewall-cmd --permanent --add-service=ssh

        sudo firewall-cmd --reload
Now you can SSH into your VM from your host machine:
ssh your_username@your_vm_ip_address - Understanding SELinux and Firewalld:
RHEL 7 is known for its strong security. Two key components are SELinux and Firewalld. SELinux provides mandatory access control, adding an extra layer of security beyond traditional Linux permissions. It's best to leave it in 'enforcing' mode for a production-like environment, but be aware it can sometimes block legitimate actions until you've configured appropriate policies. You can check its status with
sestatus.Firewalld is the dynamic firewall management tool. We used it to open the SSH port. Always explicitly open ports for services you want to expose. Don't disable these services unless you absolutely know what you're doing, especially in a production context.
- Snapshot Your VM (Best Practice):
Once you have your RHEL 7 VM in a stable, clean state with VMware Tools and basic configurations done, take a snapshot. This creates a save point you can revert to if you mess something up during experimentation. From VMware Workstation menu:
VM > Snapshot > Take Snapshot....
There you have it! Your Red Hat Enterprise Linux 7 virtual machine is now fully installed and configured on VMware Workstation. You've got a powerful, isolated environment ready for all your DevOps learning, testing, and development needs. "Bilkul ready hai for some serious kaam!"
Key Takeaways
- Installing RHEL 7 on VMware Workstation provides an isolated, robust environment crucial for DevOps learning, testing legacy applications, and specific certifications.
- Careful resource allocation (RAM, CPU, Disk) during VM creation in VMware Workstation is vital for optimal performance.
- The RHEL 7 Anaconda installer offers critical configuration points like software selection (Minimal Install is often preferred for servers) and disk partitioning.
- Post-installation steps, particularly installing VMware Tools, performing system updates, and setting up SSH, are essential for usability, performance, and remote management.
- Always enable and configure security features like SELinux and Firewalld rather than disabling them, even in a lab environment, to learn best practices.
- Taking snapshots of your VM after a clean installation provides a safe rollback point for future experiments and troubleshooting.
Frequently Asked Questions
What is Red Hat Enterprise Linux 7 and why is it still relevant?
Red Hat Enterprise Linux 7 (RHEL 7) is an enterprise-grade Linux distribution known for its stability, security, and long-term support. While newer versions exist, RHEL 7 remains highly relevant in many organizations for supporting legacy applications, adhering to specific industry certifications, or maintaining existing infrastructure that hasn't migrated. For DevOps professionals, understanding RHEL 7 is crucial for working with diverse client environments and older systems.
Can I use CentOS 7 instead of RHEL 7 for this guide?
Yes, absolutely! CentOS 7 is a community-driven, upstream binary-compatible version of RHEL 7. The installation process on VMware Workstation and most post-installation steps are virtually identical. Many developers and learners use CentOS 7 for practical purposes when they don't have a Red Hat subscription, as it provides a very similar experience to RHEL 7.
What if VMware Tools installation fails or doesn't work correctly?
If VMware Tools fail, first ensure you have the necessary build dependencies installed in RHEL 7. For RHEL 7, this usually means: sudo yum install perl gcc kernel-devel kernel-headers make -y. After installing these, try running the vmware-install.pl script again. Also, ensure your kernel version matches the kernel-devel package. Sometimes, a reboot is required after updating the kernel before installing VMware Tools.
How can I get a static IP address for my RHEL 7 VM?
You can configure a static IP during installation under "NETWORK & HOSTNAME" by clicking "Configure" and changing "IPv4 Settings" to "Manual". Post-installation, you can edit the network configuration file, usually located at /etc/sysconfig/network-scripts/ifcfg-ens33 (or similar). Change BOOTPROTO=dhcp to BOOTPROTO=static, and add lines for IPADDR, NETMASK, GATEWAY, and DNS1. After saving, restart the network service with sudo systemctl restart network or sudo nmcli connection reload && sudo nmcli connection up ens33.
There you have it, folks! This guide should have equipped you with everything you need to confidently install RedHat Enterprise Linux 7 on VMware Workstation and get it ready for your DevOps adventures. For a visual walkthrough of these steps and more hands-on guidance, make sure to check out the original video on the @explorenystream YouTube channel. Don't forget to like, share, and subscribe for more insightful tech tutorials and guides!