
Introduction to Ansible Tool A Powerpoint Presnetation
July 22, 2026 — LiveStream
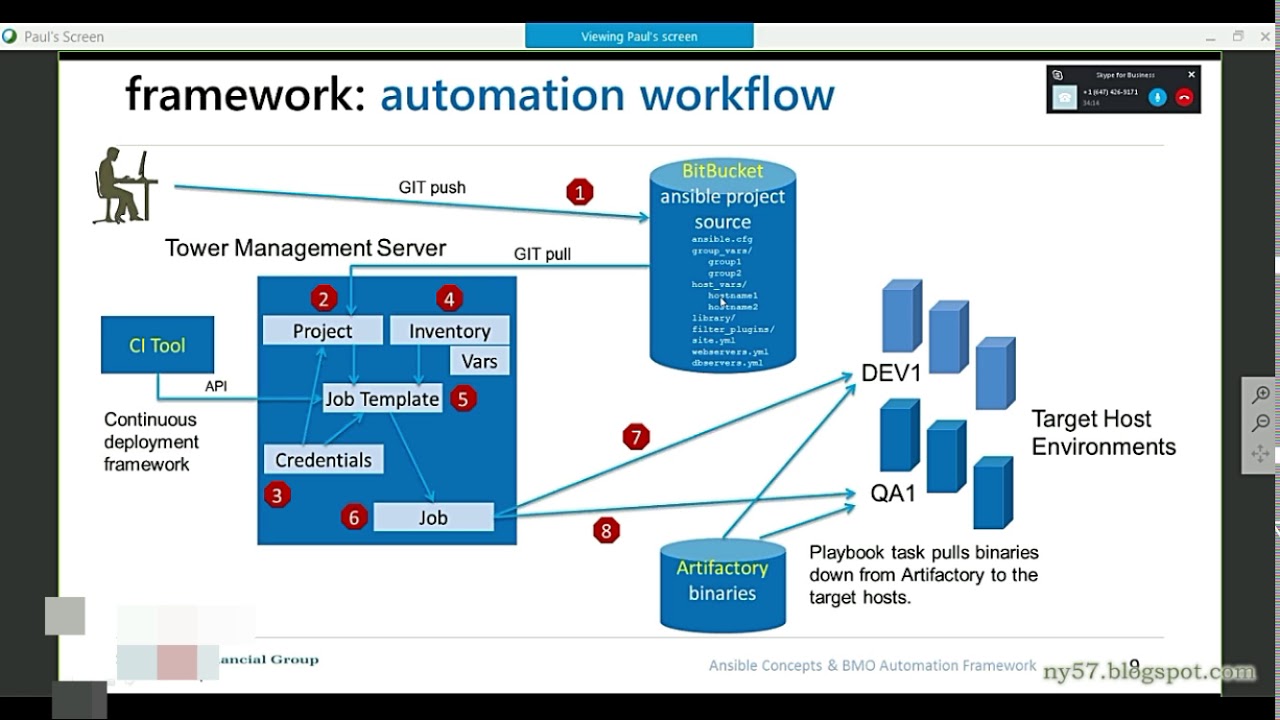
▶ Introduction to Ansible Tool A Powerpoint Presnetation | Subscribe to @explorenystream
In today's fast-paced tech world, manually managing servers and deploying applications is a recipe for disaster – it’s slow, error-prone, and scales poorly. Enter Ansible, a powerful, agentless automation engine that simplifies your IT operations, making configuration management, application deployment, and orchestration a breeze across your infrastructure. It's the go-to automation tool for any serious DevOps engineer looking to streamline their workflow and achieve consistent, reliable results.
Dekho, as a junior DevOps engineer, one of the first things you'll realize is that repetition is the enemy. Setting up a new server, deploying an application, or updating packages manually on dozens, hundreds, or even thousands of machines? Bhai, woh toh pakka headache hai! Not only is it tedious, but the chances of making a mistake – like forgetting a step on one server or using an old configuration file – are extremely high. This is precisely where the Ansible tool shines. It’s an open-source IT automation platform that fundamentally changes how you manage your infrastructure. Think of it as your intelligent assistant, ready to execute complex tasks flawlessly across your entire fleet, ensuring consistency and drastically reducing manual effort. The introduction to Ansible isn't just about learning a new tool; it's about embracing a paradigm shift towards efficient, scalable, and error-free IT operations.
Understanding Ansible: The "Why" Before the "How"
Before we dive into the nitty-gritty of how Ansible works, let's understand why it's become an indispensable part of almost every DevOps toolkit. Imagine you have a cluster of 50 web servers, all needing the same security patch, a new user account, or an application update. Doing this manually means logging into each server, running commands, and praying you don't miss anything. It's not just inefficient; it's a huge security risk and a source of potential downtime.
Ansible solves this by providing a simple, human-readable automation language (YAML) that describes the desired state of your systems. You write a "playbook" once, and Ansible ensures that all your managed nodes (the servers you're controlling) conform to that state. This core concept, known as idempotence, is crucial. It means you can run your Ansible playbook multiple times, and it will only make changes if the system isn't already in the desired state. No unnecessary reconfigurations, no errors from repeated commands.
Key Advantages of the Ansible Tool:
- Agentless: This is a massive differentiator. Unlike many other configuration management tools, Ansible doesn't require any special agents or software to be installed on your managed nodes. It communicates over standard SSH (for Linux/Unix) or WinRM (for Windows). This simplifies setup, reduces overhead, and eliminates agent maintenance headaches.
- Simple and Human-Readable: Playbooks are written in YAML, which is straightforward to read and write. Even a junior engineer can quickly grasp what a playbook is trying to achieve. There's no complex programming language to learn, just descriptive YAML syntax.
- Powerful and Versatile: From simple package installations to complex multi-tier application deployments, cloud provisioning, and continuous delivery pipelines, Ansible can handle an incredible range of automation tasks. Its extensive module library covers almost every IT operation imaginable.
- Consistent and Reliable: By automating tasks, Ansible eliminates human error. Every server configured by the same playbook will have the identical configuration, leading to greater stability and predictability in your environments.
- Low Learning Curve: Because of its simplicity and agentless nature, getting started with Ansible is remarkably quick. You can often see results within minutes of installation.
So, basically, Ansible isn't just about running commands remotely; it's about defining your infrastructure as code, ensuring every part of your system behaves exactly as you intend, consistently and reliably. This approach is fundamental to modern DevOps practices, enabling faster deployments, reduced operational costs, and higher system availability.
The Anatomy of Ansible: Core Components and How They Work
To truly master the Ansible tool, you need to understand its fundamental building blocks. Imagine you’re assembling a LEGO set; each piece has a specific role, and when put together correctly, they form a robust structure. Ansible is similar:
1. The Control Node
This is where Ansible is installed and executed. It's your workstation, a jump host, or a dedicated automation server. From here, you run your Ansible commands and playbooks. The control node initiates connections to your managed nodes via SSH or WinRM.
Installation on Control Node (Example for Ubuntu/Debian):
sudo apt update
sudo apt install software-properties-common
sudo add-apt-repository --yes --update ppa:ansible/ansible
sudo apt install ansible
Or, for a universal Python-based installation (recommended inside a virtual environment):
python3 -m venv ansible_env
source ansible_env/bin/activate
pip install ansible
2. Managed Nodes (or Hosts)
These are the servers, network devices, or cloud instances that Ansible manages. They don't need any special software installed, just a compatible SSH server (for Linux/Unix) or WinRM (for Windows) configured to accept connections from the control node. Standard Python is often required for many modules on Linux hosts, but even that isn't a hard requirement for *all* operations.
3. Inventory
The inventory file (typically named hosts or inventory.ini) is a list of your managed nodes. It tells Ansible which servers to connect to. It can be a simple INI-like file or a more structured YAML file. You can also group hosts for easier management.
Example Inventory File (inventory.ini):
[web_servers]
web1.example.com
web2.example.com ansible_port=2222

[db_servers]
db1.example.com

[all:vars]
ansible_user=devops_user
ansible_ssh_private_key_file=~/.ssh/id_rsa
Here, we’ve defined two groups: web_servers and db_servers. We've also specified a non-standard SSH port for web2.example.com and set default connection variables for all hosts, like the SSH user and private key path. This makes managing thousands of servers quite easy, just by organizing them into logical groups.
4. Modules
Modules are the actual units of work Ansible executes. They are small programs that run on the managed nodes to perform specific tasks. Ansible ships with hundreds of built-in modules covering a vast array of tasks:
apt,yum,dnf: For managing packages on different Linux distributions.service: For starting, stopping, restarting services.copy: For copying files from the control node to managed nodes.file: For managing file permissions, ownership, and existence.user,group: For managing users and groups.shell,command: For executing arbitrary commands.template: For generating configuration files from Jinja2 templates.- ...and many, many more for cloud providers, databases, network devices, etc.
When you run an Ansible task, the module code is temporarily copied to the managed node, executed, and then removed. This is part of the agentless magic!
5. Playbooks
Playbooks are the heart of Ansible automation. They are YAML files that define a set of tasks to be executed on specified hosts or groups of hosts. A playbook can contain one or more "plays," and each play targets a group of hosts and defines a list of tasks to run against them. Playbooks are how you describe your desired system state.
Example Simple Playbook (setup_webserver.yml):
---
- name: Configure a basic Nginx web server
  hosts: web_servers
  become: yes # Run tasks with sudo/root privileges
  tasks:
    - name: Ensure Nginx is installed
      ansible.builtin.apt:
        name: nginx
        state: present
        update_cache: yes

    - name: Ensure Nginx service is running and enabled
      ansible.builtin.service:
        name: nginx
        state: started
        enabled: yes

    - name: Deploy custom index.html
      ansible.builtin.copy:
        src: files/index.html
        dest: /var/www/html/index.html
        owner: www-data
        group: www-data
        mode: '0644'
To run this playbook, you would use: ansible-playbook -i inventory.ini setup_webserver.yml
This playbook targets the web_servers group, installs Nginx, ensures it's running, and deploys a custom index.html. Notice how clean and readable it is?
6. Roles
As your automation grows, managing large playbooks can become cumbersome. Ansible Roles provide a structured way to organize your playbooks, variables, templates, and files. They promote reusability and make complex automation projects more manageable.
A typical role structure looks like this:
my_role/
├── defaults/        # Default variables for the role
│   └── main.yml
├── handlers/        # Handlers (tasks that run only when notified)
│   └── main.yml
├── tasks/           # Main tasks for the role
│   └── main.yml
├── templates/       # Jinja2 templates
├── files/           # Static files to be copied
├── vars/            # Role-specific variables
│   └── main.yml
└── meta/            # Metadata about the role
    └── main.yml
You can then apply roles in your playbooks like this:
---
- name: Deploy entire application stack
  hosts: web_servers
  roles:
    - webserver
    - common_security
This modularity is crucial for scalable and maintainable DevOps automation.
Getting Started with Ansible: A Practical Walkthrough
Chal beta, ab thoda practical ho jaate hain. Let’s set up a minimal Ansible environment and run our first commands. This will give you a feel for how the Ansible tool operates.
Step 1: Install Ansible
As shown above, install Ansible on your control node. Make sure Python 3 and pip are also installed.
# Example for CentOS/RHEL
sudo yum install epel-release
sudo yum install ansible

# Example using pip (universally recommended for environment isolation)
python3 -m venv ansible_env
source ansible_env/bin/activate
pip install ansible
Step 2: Create an Inventory File
Create a file named inventory.ini in your project directory:
[my_servers]
server1.example.com
server2.example.com ansible_host=192.168.1.100

[all:vars]
ansible_user=your_ssh_username
ansible_ssh_private_key_file=~/.ssh/id_rsa
Replace server1.example.com, server2.example.com (or 192.168.1.100), your_ssh_username, and the private key path with your actual server details and credentials. Ensure your control node has SSH access to these managed nodes without password prompts (using SSH keys is best practice).
Step 3: Run Your First Ad-Hoc Command
An ad-hoc command is a simple, one-off command you can run directly from the command line. It’s useful for quick tasks.
Test Connectivity (Ping Module):
ansible -i inventory.ini my_servers -m pingThis command targets the my_servers group (-i specifies the inventory file) and uses the ping module. If successful, you should see something like:
server1.example.com | SUCCESS => {
    "ansible_facts": {
        "discovered_interpreter_python": "/usr/bin/python3"
    },
    "changed": false,
    "ping": "pong"
}
server2.example.com | SUCCESS => {
    "ansible_facts": {
        "discovered_interpreter_python": "/usr/bin/python3"
    },
    "changed": false,
    "ping": "pong"
}
Run a Shell Command:
ansible -i inventory.ini my_servers -a "uptime"This uses the default command module (or shell if you need pipes or redirection) to execute the uptime command on all servers in my_servers.
Install a Package (Requires become: yes):
ansible -i inventory.ini my_servers -m apt -a "name=htop state=present update_cache=yes" --becomeHere, we use the apt module to install htop. The --become flag tells Ansible to escalate privileges (like sudo) on the managed node.
Step 4: Write and Run Your First Playbook
Create a file named apache_install.yml:
---
- name: Install and configure Apache
hosts: my_servers
become: yes
tasks:
- name: Ensure Apache is installed
ansible.builtin.apt:
name: apache2
state: present
update_cache: yes
- name: Ensure Apache service is running and enabled
ansible.builtin.service:
name: apache2
state: started
enabled: yes
- name: Deploy a simple index.html
ansible.builtin.copy:
content: "Hello from Ansible!
"
dest: /var/www/html/index.html
owner: www-data
group: www-data
mode: '0644'Now, run the playbook:
ansible-playbook -i inventory.ini apache_install.ymlAnsible will connect to each server in the my_servers group, install Apache, start the service, and deploy the HTML file. You'll see output showing the "changed" status if modifications were made, or "ok" if the desired state was already met (due to idempotence).
Advanced Concepts and Best Practices for Robust Automation
As you get comfortable with the basics, you'll want to explore more advanced features to build truly robust and scalable configuration management solutions with Ansible.
Variables and Vault
Variables allow you to make your playbooks dynamic and reusable. You can define variables at various levels: global, group-specific (group_vars/), host-specific (host_vars/), playbook-specific, or even task-specific.
For sensitive information like API keys, database passwords, or SSH keys, never hardcode them in your playbooks. Use Ansible Vault. Vault encrypts variables and files, ensuring your sensitive data remains secure. You can encrypt a file, a specific variable, or even an entire directory.
Encrypting a file: ansible-vault encrypt vars/secret_vars.yml
Then, in your secret_vars.yml, you can store things like:
db_password: "mySuperSecretPassword123!"
api_key: "abcdef123456"
When you run a playbook that needs these variables, Ansible will prompt you for the vault password or you can provide it via a file: ansible-playbook --ask-vault-pass my_playbook.yml
Handlers: Running Tasks Conditionally
Sometimes, a change in one task (like updating a configuration file) requires another task (like restarting a service) to run, but only if the first task actually made a change. This is what handlers are for. Handlers are tasks that are only executed when explicitly "notified" by other tasks.
Example with Handler:
---
- name: Configure Apache with custom settings
  hosts: web_servers
  become: yes
  tasks:
    - name: Deploy custom Apache configuration
      ansible.builtin.template:
        src: templates/httpd.conf.j2
        dest: /etc/apache2/apache2.conf
        owner: root
        group: root
        mode: '0644'
      notify: Restart Apache # This will trigger the handler below

  handlers:
    - name: Restart Apache
      ansible.builtin.service:
        name: apache2
        state: restarted
The Restart Apache handler will only run if the template task actually changed the apache2.conf file. This ensures services are only restarted when necessary, preventing unnecessary downtime.
Idempotence: The DevOps Mantra
We touched upon idempotence earlier, but it’s worth emphasizing. Good Ansible playbooks are always idempotent. This means running a playbook multiple times should yield the same result without making redundant changes or causing errors. Modules like apt, service, copy, and file are inherently idempotent by design. For custom scripts or command/shell modules, you need to ensure your commands are idempotent (e.g., check if a file exists before creating it, or if a user exists before adding them).
Error Handling and Debugging
Ansible provides ways to handle errors gracefully. You can use ignore_errors: yes for tasks where failure isn't critical, or failed_when to define custom failure conditions. For debugging, the -vvv (verbose) flag is your best friend when running playbooks: ansible-playbook -i inventory.ini my_playbook.yml -vvv. You can also use the debug module to print variables or messages during execution.
- name: Debug some variable
  ansible.builtin.debug:
    var: my_variable_value
Integrating Ansible with CI/CD
For true DevOps automation, Ansible should be integrated into your Continuous Integration/Continuous Deployment (CI/CD) pipelines. After your code is built and tested, an Ansible playbook can automatically deploy it to staging or production environments. Tools like Jenkins, GitLab CI, GitHub Actions, or Azure DevOps can easily execute Ansible playbooks as part of their deployment stages. This ensures that every deployment is consistent, automated, and auditable.
Common Pitfalls and How to Avoid Them
Even with a tool as intuitive as Ansible, there are common mistakes junior engineers (and sometimes even experienced ones!) make. Dekho, galti sabse hoti hai, but sikhna zaroori hai.
- Hardcoding Sensitive Data: This is a big no-no. Never put passwords, API keys, or private keys directly in your playbooks or inventory. Always use Ansible Vault.
- Lack of Source Control: Your inventory, playbooks, roles, and vault files are all infrastructure as code. They should be version-controlled with Git. This provides history, collaboration, and easy rollback capabilities.
- Not Using Idempotent Tasks: Relying heavily on
commandorshellmodules without making them idempotent can lead to unexpected changes or failures when a playbook is run multiple times. Always prefer specific Ansible modules where possible, as they are usually designed to be idempotent. - Ignoring Error Handling: Not anticipating potential failures can lead to broken deployments. Use
failed_when,ignore_errors, and robust testing to handle edge cases. - Monolithic Playbooks: For complex applications, don't put everything into one giant playbook. Break it down using roles, includes, and imports for better organization and reusability.
- Running as Root Indiscriminately: While
become: yesis necessary for many tasks, always evaluate if a task truly needs root privileges. Least privilege principle applies here too. - Insufficient Testing: Never deploy an Ansible playbook to production without thoroughly testing it in a development or staging environment. Use
ansible-playbook --check(dry run) and--diffto see what changes *would* be made without actually applying them. - Poor Inventory Management: A messy or outdated inventory can lead to applying changes to the wrong servers. Keep your inventory clean, use dynamic inventories for cloud environments, and regularly verify its accuracy.
Avoiding these pitfalls will ensure your Ansible automation is reliable, secure, and maintainable in the long run.
Key Takeaways
- Ansible is an agentless, open-source automation engine for configuration management, application deployment, and orchestration.
- It uses human-readable YAML playbooks to define desired system states, promoting consistency and reducing manual errors.
- Core components include the control node, managed nodes, inventory, modules (units of work), and playbooks (automation scripts).
- Ansible Vault is essential for securing sensitive data like passwords and API keys within your automation.
- Best practices include using roles for structure, leveraging variables, implementing handlers for conditional tasks, and integrating with CI/CD pipelines for end-to-end DevOps automation.
Frequently Asked Questions
What is the main difference between Ansible and other configuration management tools like Chef or Puppet?
The primary distinction is Ansible's agentless architecture. Chef and Puppet typically require an agent installed on each managed node, which communicates with a central master server. Ansible, on the other hand, uses standard SSH (or WinRM for Windows) for communication, eliminating the need for agent installation and maintenance, simplifying setup and reducing overhead. This makes it very lightweight and easy to get started with.
Is Ansible only for Linux servers? Can it manage Windows machines or network devices?
No, Ansible is not just for Linux. While it's extensively used for Linux/Unix systems via SSH, it can effectively manage Windows machines using WinRM (Windows Remote Management). Ansible also has a growing number of modules for network automation, allowing it to configure routers, switches, and other network devices from various vendors. This versatility makes it a powerful tool for heterogeneous environments.
How does Ansible ensure that a server's configuration remains consistent over time?
Ansible achieves consistency primarily through its idempotent nature and the principle of "desired state configuration." When you run an Ansible playbook, it describes the *end state* you want your servers to be in. Ansible modules are designed to only make changes if the system is not already in that desired state. For example, if you tell Ansible to install a package, it will only install it if it's not already present. If it is, Ansible simply reports "ok" and moves on, ensuring that repeated runs don't cause unnecessary changes or errors, thus maintaining consistency.
And there you have it, a comprehensive dive into the world of Ansible. This powerful Ansible tool is truly a big deal for anyone in DevOps or IT operations. It streamlines tasks, minimizes errors, and empowers you to manage your infrastructure like a pro. To see these concepts explained visually and gain even more insights, make sure to watch the full "Introduction to Ansible Tool A Powerpoint Presnetation" video on the @explorenystream channel. Don't forget to subscribe for more amazing DevOps content!