⚙️ Provisioning Software Using Terraform | Step-by-Step Automation Guide
July 10, 2026 — LiveStream
🛒 Recommended gear on AmazonDisclosure: some links above are affiliate links — if you buy through them I may earn a small commission at no extra cost to you. Thanks for supporting the channel!
As an Amazon Associate I earn from qualifying purchases.
Provisioning software and managing infrastructure efficiently is a cornerstone of modern DevOps, and in today's fast-paced cloud native world, manual processes are a recipe for disaster. This comprehensive guide dives deep into how Terraform empowers you to automate your infrastructure and software provisioning, transforming your operations with Infrastructure as Code (IaC) for unparalleled consistency and scalability. From foundational concepts to advanced techniques, you'll learn to leverage Terraform for seamless automation.
The world of cloud computing and modern application deployment demands speed, consistency, and reliability. Gone are the days of manually clicking through cloud consoles or writing ad-hoc scripts to set up your environments. This is where tools like HashiCorp Terraform come into play, revolutionizing how we approach `provisioning software using Terraform` and infrastructure. If you've been grappling with inconsistent environments, slow deployment cycles, or the sheer drudgery of manual setup, then understanding `Terraform automation` is your next big leap. It’s not just about creating virtual machines; it's about defining your entire application ecosystem, from networks to databases to the actual `software deployment`, as code. This `step-by-step automation guide` will walk you through the journey, making sure you grasp the nuances of building a robust, automated infrastructure pipeline.
Demystifying Software Provisioning with Terraform: The IaC Revolution
Yaar, you know how crucial it is to have your environments consistent across dev, staging, and production, right? Without `Infrastructure as Code (IaC)`, it’s like building a new house every time you need a new room – slow, error-prone, and a complete headache. Imagine manually setting up an EC2 instance, configuring its security groups, attaching an EBS volume, and then doing it all over again for the next ten environments. *Thak jaoge!* (You'll get tired!) That’s the classic pain point IaC addresses, and `Terraform` is arguably the undisputed king of this domain.
`Terraform` is an open-source `IaC` tool that allows you to define and provision data center infrastructure using a declarative configuration language. Instead of writing scripts that tell your cloud provider *how* to build something (imperative), `Terraform` lets you describe *what* you want (declarative). You write configuration files that specify the desired state of your infrastructure – say, an AWS VPC, a few subnets, an EC2 instance, and maybe an S3 bucket. `Terraform` then figures out the `how`, creating, updating, or even destroying resources to match your defined state. This fundamental shift from "how" to "what" is incredibly powerful. It brings software development best practices – version control, peer review, automated testing – directly to your infrastructure. No more "it works on my machine" excuses for your infrastructure, boss!
Why is this a revolution? Because manual provisioning is inherently flawed. It introduces human error, leads to configuration drift over time, and severely limits scalability. Every time you need to scale up or replicate an environment, you're either doing repetitive manual work or relying on fragile, one-off scripts. `Terraform` eliminates these issues by providing:
* **Consistency:** Your infrastructure is defined in code, ensuring every environment built from that code is identical.
* **Repeatability:** Need another test environment? Just run `terraform apply`.
* **Speed:** Provision complex environments in minutes, not hours or days.
* **Version Control:** Store your infrastructure code in Git, track changes, revert to previous versions, and collaborate effectively.
* **Reduced Risk:** `terraform plan` shows you exactly what changes `Terraform` will make *before* it makes them, preventing nasty surprises.
* **Cost Optimization:** Easily identify and destroy unused resources, and get a clear overview of your deployed infrastructure.
The magic behind `Terraform` lies in its workflow and key concepts. You define resources using `providers` (e.g., AWS, Azure, GCP, Kubernetes, Docker, GitHub – practically anything with an API!). Each provider exposes various `resources` (e.g., `aws_instance`, `aws_vpc`, `kubernetes_deployment`). You also use `data sources` to fetch information about existing resources. All this information is stored in a `Terraform state file`, which acts as a map between your configuration and the real-world infrastructure. This state file is crucial because it allows `Terraform` to know what already exists and what needs to be created, updated, or destroyed, ensuring `idempotence` – running the same configuration multiple times yields the same result without unintended side effects. Without `idempotence`, your automation would be unreliable and unpredictable.
Getting Started with Terraform: A Step-by-Step Guide to Automation
Alright, enough theory. Let’s get our hands dirty and actually `provision software using Terraform`. We'll set up a simple web server on AWS as our example. This process will highlight the core `Terraform workflow`: `init`, `plan`, `apply`, and `destroy`.
**1. Prerequisites:**
Before we start, make sure you have:
* **Terraform Installed:** Download it from the HashiCorp website and add it to your PATH.
* **AWS CLI Configured:** Ensure your AWS credentials are set up (e.g., via `aws configure`). `Terraform` will use these to authenticate with AWS.
* **Basic AWS Knowledge:** Understanding of VPCs, EC2, Security Groups will be helpful.
**2. Create Your Terraform Configuration:**
Let's create a directory for our project, say `my-web-server`, and inside it, we'll create a few `.tf` files.
* **`main.tf`**: This will contain our primary resource definitions.
* **`variables.tf`**: To define input variables for our configuration.
* **`outputs.tf`**: To define output values that `Terraform` will display after applying.
**`main.tf` example:**
# Configure the AWS Provider
provider "aws" {
  region = var.aws_region
}

# Create a VPC
resource "aws_vpc" "main" {
  cidr_block = var.vpc_cidr_block
  enable_dns_hostnames = true
  enable_dns_support   = true

  tags = {
    Name = "${var.project_name}-vpc"
  }
}

# Create a Public Subnet
resource "aws_subnet" "public" {
  vpc_id                  = aws_vpc.main.id
  cidr_block              = var.public_subnet_cidr_block
  map_public_ip_on_launch = true # Automatically assign public IP to instances
  availability_zone       = "${var.aws_region}a"

  tags = {
    Name = "${var.project_name}-public-subnet"
  }
}

# Create an Internet Gateway
resource "aws_internet_gateway" "main" {
  vpc_id = aws_vpc.main.id

  tags = {
    Name = "${var.project_name}-igw"
  }
}

# Create a Route Table and associate it with the Public Subnet
resource "aws_route_table" "public" {
  vpc_id = aws_vpc.main.id

  route {
    cidr_block = "0.0.0.0/0"
    gateway_id = aws_internet_gateway.main.id
  }

  tags = {
    Name = "${var.project_name}-public-route-table"
  }
}

resource "aws_route_table_association" "public" {
  subnet_id      = aws_subnet.public.id
  route_table_id = aws_route_table.public.id
}

# Create a Security Group for the web server
resource "aws_security_group" "web_sg" {
  vpc_id = aws_vpc.main.id
  name   = "${var.project_name}-web-sg"
  description = "Allow HTTP and SSH inbound traffic"

  ingress {
    from_port   = 22
    to_port     = 22
    protocol    = "tcp"
    cidr_blocks = ["0.0.0.0/0"] # Be more restrictive in production!
    description = "Allow SSH from anywhere"
  }

  ingress {
    from_port   = 80
    to_port     = 80
    protocol    = "tcp"
    cidr_blocks = ["0.0.0.0/0"] # Allow HTTP from anywhere
    description = "Allow HTTP from anywhere"
  }

  egress {
    from_port   = 0
    to_port     = 0
    protocol    = "-1" # Allow all outbound traffic
    cidr_blocks = ["0.0.0.0/0"]
  }

  tags = {
    Name = "${var.project_name}-web-sg"
  }
}

# Launch an EC2 instance (our web server)
resource "aws_instance" "web_server" {
  ami           = "ami-0abcdef1234567890" # Replace with a valid AMI ID for your region (e.g., Amazon Linux 2 AMI)
  instance_type = var.instance_type
  subnet_id     = aws_subnet.public.id
  vpc_security_group_ids = [aws_security_group.web_sg.id]
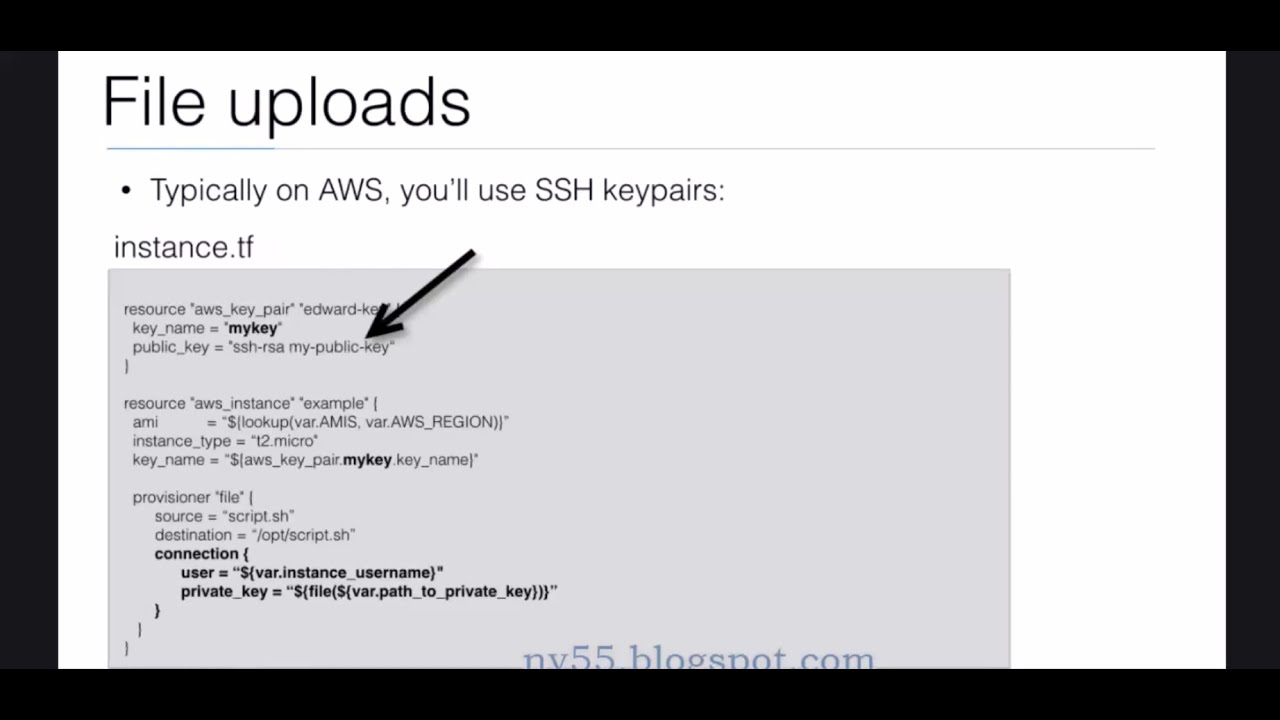
  key_name      = var.key_pair_name # Replace with your SSH key pair name
  associate_public_ip_address = true

  # User data to install and start Nginx on launch
  user_data = <<-EOF
              #!/bin/bash
              sudo yum update -y
              sudo yum install -y nginx
              sudo systemctl start nginx
              sudo systemctl enable nginx
              echo "<h1>Hello from Terraform-provisioned Nginx!</h1>" | sudo tee /usr/share/nginx/html/index.html
              EOF

  tags = {
    Name = "${var.project_name}-web-server"
  }
}
**`variables.tf` example:**
variable "aws_region" {
  description = "The AWS region to deploy resources in."
  type        = string
  default     = "us-east-1"
}

variable "project_name" {
  description = "A unique name for your project, used for resource tagging."
  type        = string
  default     = "TerraformWeb"
}

variable "vpc_cidr_block" {
  description = "CIDR block for the VPC."
  type        = string
  default     = "10.0.0.0/16"
}

variable "public_subnet_cidr_block" {
  description = "CIDR block for the public subnet."
  type        = string
  default     = "10.0.1.0/24"
}

variable "instance_type" {
  description = "The EC2 instance type for the web server."
  type        = string
  default     = "t2.micro"
}

variable "key_pair_name" {
  description = "The name of your EC2 Key Pair for SSH access."
  type        = string
  default     = "my-ssh-key" # CHANGE THIS to your actual key pair name!
}
**`outputs.tf` example:**
output "web_server_public_ip" {
  description = "The public IP address of the web server."
  value       = aws_instance.web_server.public_ip
}

output "web_server_public_dns" {
  description = "The public DNS name of the web server."
  value       = aws_instance.web_server.public_dns
}
**Important:** Remember to replace the `ami` ID in `main.tf` with a valid one for your chosen region and the `key_pair_name` in `variables.tf` with your actual SSH key pair.
**3. The Terraform Workflow:**
Now, let's run `Terraform`!
* **`terraform init`**:
This command initializes a working directory containing `Terraform` configuration files. It downloads the necessary `provider` plugins (in our case, the `aws` provider). *Pehli baar toh chalta hi hai!* (It runs the first time itself!)
    cd my-web-server
    terraform init
* **`terraform plan`**:
This is your dry run, an extremely critical step. It generates an execution plan, showing you exactly what actions `Terraform` will take to reach the desired state defined in your configuration. It will tell you what resources will be created, updated, or destroyed. *Always run this first!*
terraform plan
Review the output carefully. Look for `+` (create), `~` (update), `-` (destroy).
* **`terraform apply`**:
If you're happy with the plan, `terraform apply` executes the actions proposed in the plan. It will prompt you for confirmation before making any changes to your real cloud infrastructure. Type `yes` when prompted.
terraform apply
Once finished, `Terraform` will print the `outputs` we defined, including your web server's public IP and DNS. Open your browser and navigate to the public IP or DNS – you should see "Hello from Terraform-provisioned Nginx!". *Kya baat hai, automation ho gayi!* (Wow, automation happened!)
* **`terraform destroy`**:
When you're done with your environment, it's good practice to tear it down to avoid incurring unnecessary costs. `terraform destroy` will remove all resources managed by your current `Terraform` configuration. Again, it will show a plan and ask for confirmation.
terraform destroy
This simple `step-by-step Terraform guide` demonstrates the power of `Terraform automation` for `provisioning software` and infrastructure. We've gone from zero to a running web server with minimal manual intervention, defining everything as code.
Advanced Terraform Techniques & Best Practices for Robust Provisioning
The basic workflow is powerful, but for real-world scenarios, you need to elevate your game. Let's talk about some `Terraform best practices` and advanced techniques that senior DevOps engineers swear by.
**1. Modularization with Terraform Modules:**
As your infrastructure grows, having all resources in one `main.tf` file becomes unmanageable. This is where `Terraform modules` come in. A module is a container for multiple resources that are used together. Think of them as reusable blueprints. For example, you can create a "vpc" module that provisions a VPC, subnets, and an internet gateway, or an "ec2-instance" module that sets up an EC2 instance with its associated security groups and IAM roles.
* **Why use modules?**
* **Reusability:** Write once, use everywhere.
* **Organization:** Break down complex configurations into smaller, manageable pieces.
* **Encapsulation:** Hide internal complexity from consumers.
* **Consistency:** Standardize infrastructure patterns across your organization.
You can create your own local modules or leverage modules from the Terraform Registry. For instance, instead of writing all the VPC boilerplate, you could use a community-maintained module:
# main.tf (using a module)
module "vpc" {
  source = "terraform-aws-modules/vpc/aws"
  version = "3.1.0" # Always pin module versions!

  name = var.project_name
  cidr = var.vpc_cidr_block

  azs             = ["${var.aws_region}a", "${var.aws_region}b"]
  private_subnets = ["10.0.1.0/24", "10.0.2.0/24"]
  public_subnets  = ["10.0.101.0/24", "10.0.102.0/24"]

  enable_nat_gateway = true
  single_nat_gateway = true

  tags = {
    Environment = "Development"
  }
}

# Now reference outputs from the module, e.g., module.vpc.public_subnets
**2. State Management: The Backbone of Terraform:**
We briefly mentioned the `Terraform state file`. This `tfstate` file maps your configuration to your actual resources. By default, `Terraform` stores this locally (`terraform.tfstate`). However, in a team environment or for production, **local state is a big NO-NO!** It leads to state conflicts, data loss, and makes collaboration impossible.
You must configure a `remote state` backend. The most common choice for AWS users is an S3 bucket, optionally with DynamoDB for state locking. `Remote state` provides:
* **Collaboration:** Multiple team members can work on the same infrastructure without state conflicts.
* **Durability:** State is stored reliably in a remote, highly available service.
* **State Locking:** Prevents concurrent `terraform apply` operations from corrupting the state (especially important with DynamoDB).
# backend.tf
terraform {
  backend "s3" {
    bucket         = "my-terraform-state-bucket-12345" # Replace with your unique S3 bucket name
    key            = "webserver/terraform.tfstate"
    region         = "us-east-1"
    encrypt        = true
    dynamodb_table = "terraform-lock-table" # Optional: For state locking
  }
}
After adding this, run `terraform init` again. It will prompt you to migrate your state to the S3 backend.
**3. Secrets Management:**
Never, ever hardcode sensitive information like API keys, database passwords, or SSH keys in your `Terraform` configuration. This is a massive security vulnerability. Integrate with dedicated secrets management solutions:
* **AWS Secrets Manager / AWS Parameter Store:** For AWS environments.
* **HashiCorp Vault:** A popular, more generic solution for multi-cloud and on-premises.
* **Environment Variables:** For less sensitive, temporary credentials.
Terraform has data sources for these, allowing you to fetch secrets securely at runtime without committing them to your repository.
**4. Managing Multiple Environments (Dev, Staging, Prod):**
There are generally two approaches:
* **Workspaces:** `terraform workspace new
` allows you to manage multiple states for a single configuration. Each workspace gets its own `.tfstate` file. Good for simple variations.
* **Directory Structure:** A more robust approach for complex differences. You'd have `environments/dev`, `environments/staging`, `environments/prod` directories, each containing its own root `Terraform` configuration. You might use `Terraform modules` to share common components across these environments. This approach is generally preferred for production setups.
**5. CI/CD Integration:**
For true `Terraform automation`, integrate your `Terraform` workflow into your CI/CD pipeline (Jenkins, GitLab CI, GitHub Actions, Azure DevOps, etc.).
* **Commit -> Plan:** A pull request (PR) triggers a `terraform plan`, and the output is posted as a comment on the PR. This allows peer review of infrastructure changes.
* **Merge -> Apply:** Merging to a `main` or `production` branch automatically triggers `terraform apply`.
* **Automated Testing:** Incorporate tools like `TerraTest` (Go-based) or `Terraspec` (Ruby-based) to validate your infrastructure code before deployment.
This ensures that every infrastructure change goes through a standardized, automated, and reviewed process, minimizing risks.
Beyond Infrastructure: Truly Provisioning Software & Applications
While `Terraform` excels at `cloud provisioning` and infrastructure creation, the "software" part of `provisioning software using Terraform` often needs an additional layer. Terraform's strength is *what* exists, not *what runs inside* it, although it can kickstart that process effectively.
**1. Leveraging User Data / Cloud-init:**
As seen in our example, the `user_data` argument for `aws_instance` (or equivalent for other cloud providers) is a powerful way to inject scripts that run on the first boot of a new instance. This is perfect for:
* Installing initial packages (like Nginx, Docker, Git).
* Configuring hostnames.
* Setting up users.
* Downloading application artifacts.
This technique is excellent for basic, initial `software deployment` and setup right after provisioning the VM.
**2. Integrating with Configuration Management Tools:**
For more complex and ongoing `software provisioning`, configuration management (CM) tools are the perfect complement to `Terraform`. While `Terraform` creates and manages the lifecycle of the infrastructure, tools like Ansible, Chef, Puppet, or SaltStack configure the software *within* those instances.
* **Terraform provisions:** EC2 instances, security groups, load balancers.
* **CM tools configure:** Web servers (Apache, Nginx with specific configurations), databases, application runtime environments, application deployments, OS-level settings.
You can invoke CM tools from `Terraform`'s `local-exec` provisioner or, more commonly, within your CI/CD pipeline after `Terraform` has completed its `apply`. For example, once `Terraform` provisions an EC2 instance, your CI/CD pipeline can then trigger an Ansible playbook targeting that new instance's public IP to install and configure your application.
**3. Containerization and Orchestration with Kubernetes:**
In many modern architectures, `provisioning software` means deploying containers onto an orchestrator like Kubernetes. `Terraform` is perfectly capable of provisioning the Kubernetes cluster itself:
* **AWS EKS:** Use `Terraform` to create and manage EKS clusters, node groups, and associated networking.
* **Azure AKS:** Provision Azure Kubernetes Service clusters.
* **GCP GKE:** Deploy Google Kubernetes Engine clusters.
Once the cluster is up and running, you'd typically use `Kubernetes manifests`, `Helm charts`, or `ArgoCD`/`FluxCD` (GitOps tools) to deploy your actual containerized applications *into* the cluster. `Terraform` can also manage some Kubernetes resources directly via the Kubernetes provider, especially for cluster-wide configurations like namespaces or RBAC roles. This is where `Terraform` provides the `infrastructure automation`, and Kubernetes handles the `software deployment` lifecycle within the cluster.
**4. Serverless Deployments with Terraform:**
For serverless architectures, `Terraform` can directly define and `provision software` components like AWS Lambda functions, API Gateway endpoints, SQS queues, DynamoDB tables, and S3 buckets for static site hosting. You can even package your Lambda code (e.g., as a `.zip` file) and specify it directly within your `Terraform` configuration. This is one of the clearest examples where `Terraform` directly provisions both the infrastructure and the associated application logic.
# Example: Provisioning a simple AWS Lambda function with Terraform
resource "aws_lambda_function" "my_lambda" {
  function_name = "my-greeting-function"
  filename      = "lambda_function_payload.zip" # Path to your zipped code
  handler       = "index.handler"
  runtime       = "nodejs16.x"
  role          = aws_iam_role.lambda_exec_role.arn
  timeout       = 30

  environment {
    variables = {
      GREETING = "Hello from Lambda!"
    }
  }

  tags = {
    Project = var.project_name
  }
}

resource "aws_iam_role" "lambda_exec_role" {
  name = "lambda_exec_role"

  assume_role_policy = jsonencode({
    Version = "2012-10-17"
    Statement = [
      {
        Action    = "sts:AssumeRole"
        Effect    = "Allow"
        Principal = {
          Service = "lambda.amazonaws.com"
        }
      },
    ]
  })
}

resource "aws_iam_role_policy_attachment" "lambda_policy" {
  role       = aws_iam_role.lambda_exec_role.name
  policy_arn = "arn:aws:iam::aws:policy/service-role/AWSLambdaBasicExecutionRole"
}
This snippet shows how `Terraform` provisions the Lambda function and its execution role directly, truly `provisioning software` in a serverless context.
**5. Advanced Deployment Strategies (Blue/Green, Canary):**
For zero-downtime deployments and reduced risk, `Terraform` can play a pivotal role in implementing strategies like Blue/Green deployments or Canary releases. Instead of updating existing resources, `Terraform` can provision an entirely new "Green" environment alongside the "Blue" (current) one. Once the new environment is tested, traffic is shifted using a load balancer (also managed by `Terraform`). This guarantees a quick rollback if something goes wrong, as the "Blue" environment is still intact.
By combining `Terraform` with configuration management tools, container orchestrators, and leveraging cloud-native features like `user_data` and serverless functions, you can achieve comprehensive `automation` for both your infrastructure and the `software deployment` on top of it. It’s all about building a robust, repeatable, and reliable deployment pipeline, ensuring your software reaches users smoothly and consistently.
Key Takeaways
- Terraform is an indispensable Infrastructure as Code (IaC) tool that defines and provisions cloud infrastructure declaratively, ensuring consistency, repeatability, and efficiency in DevOps workflows.
- The core Terraform workflow involves `init` (initializing the working directory), `plan` (previewing changes), `apply` (executing changes), and `destroy` (tearing down resources).
- For robust, collaborative, and secure deployments, always use `Terraform modules` for organization and reusability, configure `remote state` (e.g., S3 with DynamoDB locking), and integrate with `secrets management` solutions.
- While Terraform primarily provisions infrastructure, it facilitates `software provisioning` through `user_data` scripts for initial setup, or by integrating with configuration management tools (Ansible, Chef) for ongoing configuration.
- Modern `software deployment` with Terraform extends to provisioning container orchestration clusters (EKS, AKS, GKE) and direct deployment of serverless applications (Lambda functions), enabling advanced CI/CD pipelines and deployment strategies like Blue/Green.
Frequently Asked Questions
What is Infrastructure as Code (IaC) and why is Terraform an ideal IaC tool?
Infrastructure as Code (IaC) is the practice of managing and provisioning infrastructure through code instead of manual processes. Terraform is an ideal IaC tool because it uses a declarative configuration language (HCL) to define desired infrastructure states across various cloud providers (multi-cloud support), offers a clear execution plan with `terraform plan`, manages state for consistency, and supports modularity for reusability, making infrastructure consistent, repeatable, and version-controlled.
How does Terraform handle state management for consistent deployments?
Terraform manages its state in a `terraform.tfstate` file, which maps the resources defined in your configuration to the real-world infrastructure. This state file allows Terraform to understand what currently exists, track metadata about your resources, and compute accurate execution plans. For consistent and collaborative deployments, especially in team environments, it's crucial to use `remote state` backends (like AWS S3 with DynamoDB locking) to prevent conflicts, ensure durability, and enable state locking.
Can Terraform deploy applications or just infrastructure?
Terraform primarily provisions infrastructure, but it can indirectly and directly facilitate application deployment. It can set up the underlying infrastructure (VMs, networks, databases) and then use `user_data` scripts for initial software installation. For more complex application deployments, it integrates with configuration management tools (e.g., Ansible) or provisions container orchestration platforms (like Kubernetes) onto which applications are deployed. In serverless contexts (e.g., AWS Lambda), Terraform can directly deploy application code as part of provisioning the serverless function itself.
What are the common pitfalls when using Terraform and how can they be avoided?
Common pitfalls include using local state (avoid by configuring remote state with locking), hardcoding sensitive information (avoid with secrets management tools like AWS Secrets Manager or HashiCorp Vault), not pinning provider or module versions (always specify exact versions to prevent breaking changes), and neglecting `terraform plan` (always review the plan carefully before applying). Another pitfall is not adopting a clear module structure or environment strategy, leading to unmanageable code; this can be avoided by embracing modules and distinct directory structures for different environments (dev, staging, prod).
We've covered a lot of ground today, from the fundamental `Terraform automation` concepts to advanced `provisioning software` techniques. The journey of a DevOps engineer is always about continuous learning and adopting better tools, and `Terraform` is undoubtedly one of the most powerful ones in your arsenal. To see these concepts in action and get a visual walkthrough, make sure to watch the full video on @explorenystream – it’s an excellent way to solidify your understanding and see these commands come to life. Don't forget to subscribe to the channel for more invaluable insights into the world of DevOps!