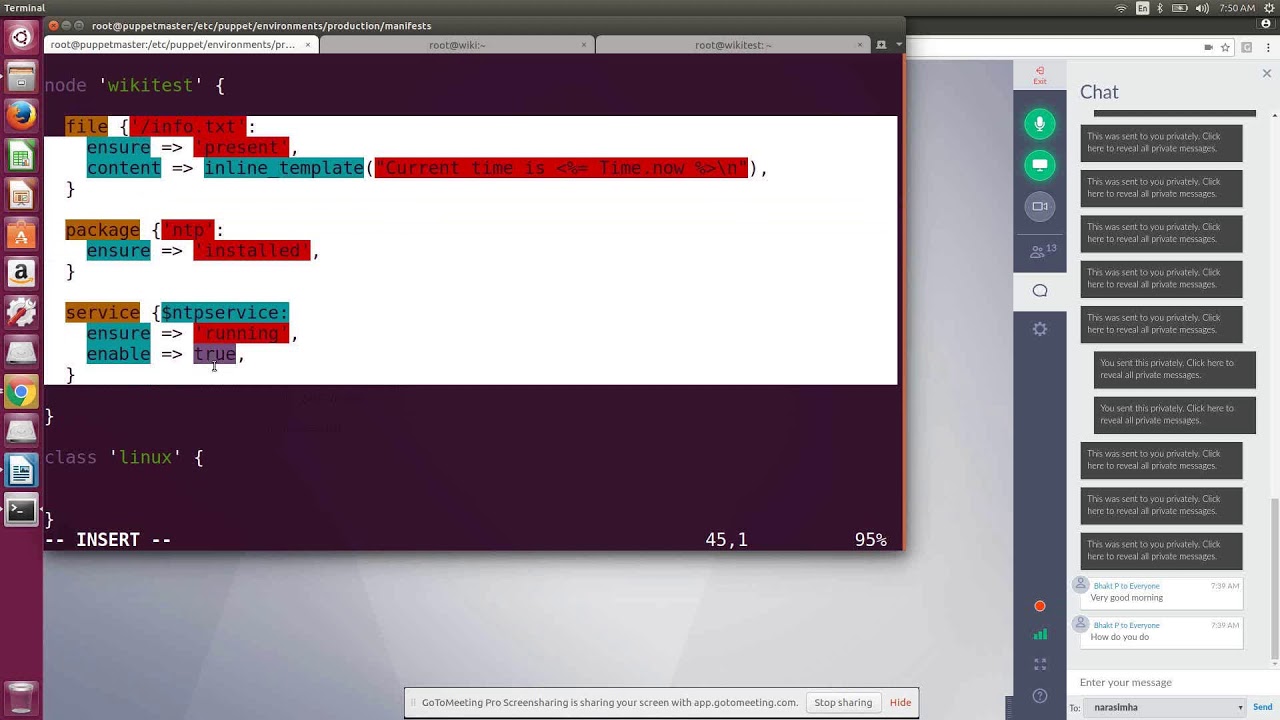
Puppet Part3 DEVOPS ONLINE TRAINING
July 12, 2026 — LiveStream
🛒 Recommended gear on AmazonDisclosure: some links above are affiliate links — if you buy through them I may earn a small commission at no extra cost to you. Thanks for supporting the channel!
As an Amazon Associate I earn from qualifying purchases.
In the fast-paced world of DevOps, automating infrastructure management is no longer a luxury but a necessity. Puppet, a robust configuration management tool, is a cornerstone for achieving this automation, ensuring your systems are consistent, scalable, and secure. This guide dives deep into the practical aspects of Puppet, specifically building upon foundational concepts and exploring advanced techniques crucial for any serious DevOps engineer, mirroring the in-depth insights you'd expect from a comprehensive "Puppet Part3 DEVOPS ONLINE TRAINING" session.
So, tum bhi ek cup chai le lo, aur baith jaao. Aaj hum Puppet ke thodi gehri baaton mein ghusenge, jahan sirf commands nahi, balki unke peeche ki philosophy aur best practices samajhna zaroori hai. If you're serious about mastering Puppet for modern DevOps workflows, understanding its core components beyond basic resource declarations is absolutely critical. This isn't just about making things work; it's about making them work *right*, making them scalable, and maintaining them effortlessly.
Puppet Ka Mahaul: Why It's Still a DevOps Powerhouse
Dekho, jab hum infrastructure as code (IaC) ki baat karte hain na, toh Puppet ka naam top par aata hai. Kyunki yeh sirf scripts execute nahi karta; yeh 'desired state' achieve karta hai. Matlab, tum Puppet ko bataate ho ki tumhari machine *kaisi honi chahiye*, aur Puppet automatically us state ko maintain karta hai. Agar koi change karta hai system mein, Puppet usko wapas desired state mein le aata hai. Isn't that powerful?
This idempotent nature is what makes Puppet a superhero in DevOps. Imagine you have hundreds or thousands of servers. Manually configuring each one? Impossible. Scripting with Bash? Great for one-off tasks, but what if something drifts? What if you need to update a configuration across all of them efficiently? That's where Puppet shines. It provides a declarative language to describe your infrastructure's desired state, from package installations and service configurations to file permissions and user accounts.
In the context of "Puppet Part3 DEVOPS ONLINE TRAINING," we're moving past the "what is Puppet" and "how do I install a package" stage. Now, it's about structuring your Puppet code for large-scale environments, making it dynamic, and mastering the agent-master communication, which are all vital aspects of advanced Puppet DevOps.
Deeper Dive into Puppet's Core Components: Manifests, Modules, and Classes
Chalo, ab sabse important cheez par aate hain: Puppet code kaise likhte aur organize karte hain. Starting with simple manifests is fine, but for a real-world, complex infrastructure, you need structure. And that structure comes from **modules** and **classes**.
Puppet Manifests: The Heart of Your Configuration
Manifests (`.pp` files) are where you write your Puppet code. They contain resource declarations, which describe the desired state of a specific component on your system. For example:
file { '/etc/motd':
  ensure  => file,
  content => 'Welcome to our Puppet-managed server!',
  owner   => 'root',
  group   => 'root',
  mode    => '0644',
}
This simple manifest ensures that the `/etc/motd` file exists, has specific content, ownership, and permissions. Each resource declaration follows a `resource_type { 'resource_title': attribute => value, ... }` pattern. Simple, right? But imagine having hundreds of such resources for various configurations across multiple servers. Keeping them in one big file or scattered randomly is a recipe for disaster. This is why we need modules.
The Backbone of Scalability: Puppet Modules
Modules are self-contained, shareable units of Puppet code that encapsulate manifests, templates, files, and plugins. Think of them as building blocks for your infrastructure. They allow you to organize your Puppet code logically, making it easier to manage, reuse, and share across different environments or even with the community (Puppet Forge).
A well-structured module ensures that your configurations are modular and maintainable. This is a huge focus in any advanced "Puppet Part3 DEVOPS ONLINE TRAINING" because it directly impacts your ability to scale.
Standard Module Directory Structure: Har Cheez Apni Jagah Par
Every Puppet module typically follows a specific directory structure. Yeh structure follow karna best practice hai:
mymodule/
manifests/
init.pp
config.pp
install.pp
files/
templates/
lib/
facts.d/
data/
examples/
spec/
metadata.json
Samjhe? Har cheez ka apna folder hai. Isse code clean rehta hai.
Puppet Classes: Reusable Code Blocks
Classes are named blocks of Puppet code that are stored in modules and can be declared to configure nodes. They allow you to group related resources and parameters together, making your code more abstract and reusable.
Defining a Class
A class definition typically lives in a manifest file within the `manifests/` directory of a module. For example, a class to install and configure an Apache web server might look like this:
# myapache/manifests/init.pp
class myapache (
  $ensure_package = 'present',
  $port           = 80,
  $docroot        = '/var/www/html',
) {
  package { 'apache2':
    ensure => $ensure_package,
  }

  file { '/etc/apache2/sites-available/000-default.conf':
    ensure  => file,
    content => template('myapache/vhost.conf.erb'), # Using a template
    require => Package['apache2'],
    notify  => Service['apache2'],
  }

  service { 'apache2':
    ensure    => running,
    enable    => true,
    subscribe => File['/etc/apache2/sites-available/000-default.conf'],
  }

  file { $docroot:
    ensure  => directory,
    owner   => 'www-data',
    group   => 'www-data',
    mode    => '0755',
    require => Package['apache2'],
  }
}
Notice the parameters `$ensure_package`, `$port`, `$docroot`. These make the class flexible. You can customize its behavior without changing the class definition itself. This level of parameterization is a key learning in any advanced "Puppet Part3 DEVOPS ONLINE TRAINING."
Declaring a Class
Once a class is defined, you can "declare" it on your nodes to apply its configuration. This is usually done in your node classifier (like `site.pp` or an external node classifier - ENC).
# In your node definition, e.g., site.pp or a dedicated node manifest
node 'webserver01.example.com' {
  include myapache # Simple inclusion, uses default parameters
}

node 'webserver02.example.com' {
  class { 'myapache': # Declaring with custom parameters
    port      => 8080,
    docroot   => '/srv/web',
  }
}
This separation of definition and declaration is crucial for managing complex infrastructure. You define the blueprint once in a module, and then you apply it to various nodes with specific configurations.
Mastering Puppet Resources: Files, Packages, Services, and Users
In "Puppet Part3 DEVOPS ONLINE TRAINING," we often spend significant time on common resource types. Yehi toh foundation hai! Let's explore some of them in more detail, beyond just the `ensure => present` part.
The `file` Resource: Configures Files and Directories
The `file` resource is one of the most versatile. It can manage files, directories, and symlinks.
file { '/etc/mywebapp/config.json':
  ensure  => file,                 # Can be 'file', 'directory', 'link', 'absent'
  content => '{ "database": "production_db", "port": 5432 }', # Inline content
  source  => 'puppet:///modules/mywebapp/config.json', # Content from a file in the module
  owner   => 'webapp',
  group   => 'webapp',
  mode    => '0640',               # Permissions in octal
  # Templates (ERB) for dynamic content:
  # content => template('mywebapp/config.json.erb'),
}
* **`ensure`**: Specifies the state (`file`, `directory`, `link`, `absent`).
* **`content`**: Directly specifies the content.
* **`source`**: Fetches content from a file in a module (e.g., `puppet:///modules/mymodule/myfile`).
* **`template`**: Uses an ERB template to generate content dynamically (e.g., `template('mymodule/mytemplate.erb')`). This is where the real power lies for generating environment-specific configurations.
* **`owner`, `group`, `mode`**: Standard file system permissions.
The `package` Resource: Manages Software Packages
This is straightforward but critical for software installation.
package { 'nginx':
  ensure   => present,          # Can be 'present', 'latest', 'purged', 'absent', or a specific version like '1.18.0'
  provider => 'apt',            # Optional: Specify package manager (e.g., apt, yum, brew)
  before   => File['/etc/nginx/nginx.conf'], # Order dependency
}
* **`ensure`**: `present` (installs if missing), `latest` (upgrades to the newest version), `absent` (removes package), `purged` (removes package and configuration files). You can also pin to a specific version.
* **`provider`**: Usually Puppet auto-detects, but sometimes explicit specification helps (e.g., `yum`, `apt`, `gem`, `pip`).
The `service` Resource: Manages System Services
Once a package is installed, you usually need to manage its associated service.
service { 'nginx':
  ensure    => running,        # Can be 'running' or 'stopped'
  enable    => true,           # Starts service on boot (true/false)
  subscribe => File['/etc/nginx/nginx.conf'], # React to file changes
  require   => Package['nginx'], # Ensure package is installed first
}
* **`ensure`**: `running` (ensures service is active), `stopped` (ensures service is inactive).
* **`enable`**: `true` ensures the service starts automatically on boot.
* **`subscribe`**: This is a reactive dependency. If the subscribed resource changes (e.g., a configuration file), the service will be restarted.
* **`require`**: A proactive dependency. Ensures the required resource is managed *before* this one.
The `user` Resource: Manages User Accounts
Creating and managing user accounts is a common task, especially for application users.
user { 'devops_user':
  ensure     => present,
  home       => '/home/devops_user',
  shell      => '/bin/bash',
  password   => '$6$salt$encrypted_password_hash', # Use output from mkpasswd -m sha-512
  groups     => ['sudo', 'docker'], # Add to additional groups
  managehome => true,           # Create home directory if it doesn't exist
}
* **`ensure`**: `present` or `absent`.
* **`home`**, **`shell`**: Standard Unix user attributes.
* **`password`**: Crucial for security. *Never* put plain text passwords. Always use a hashed password.
* **`groups`**: An array of supplementary groups the user should belong to.
* **`managehome`**: If `true`, Puppet will create the home directory if it doesn't exist.
Understanding these resources deeply, including their attributes and interdependencies, is vital for writing effective Puppet code. In a comprehensive "Puppet Part3 DEVOPS ONLINE TRAINING," you'd practice these with real-world scenarios.
Dynamic Infrastructure with Puppet: Variables, Facts, and Conditionals
Ab, sirf static configuration se kaam nahi chalta. Humari infrastructure dynamic hoti hai, har server alag ho sakta hai, har environment ki apni requirement hoti hai. Puppet ko intelligent banane ke liye hum variables, facts aur conditionals use karte hain.
Puppet Variables: Storing and Reusing Values
Variables in Puppet allow you to store values and reuse them throughout your manifests. This avoids repetition and makes your code cleaner and easier to update.
$my_app_version = '1.0.0'
$doc_root       = '/var/www/my_app'

package { 'my_app':
  ensure => $my_app_version,
}

file { $doc_root:
  ensure => directory,
  owner  => 'my_app_user',
  group  => 'my_app_group',
  mode   => '0755',
}
Variables can be defined at different scopes (global, node, class), with specific rules determining which value is used. Understanding variable scope is crucial to avoid unexpected behavior.
Facter: Unlocking System-Specific Information (Facts)
Facter is Puppet's built-in tool for collecting information about the node on which Puppet is running. These pieces of information are called "facts." Facter automatically gathers a huge amount of data: OS type, IP address, kernel version, memory, CPU count, virtual machine status, and much more. You can then use these facts as variables in your Puppet code.
This is extremely powerful for making your configurations adaptive. For example, installing different packages based on the operating system:
# Install different web servers based on OS family
if $::osfamily == 'RedHat' {
  package { 'httpd': ensure => present }
  service { 'httpd': ensure => running, enable => true }
} elsif $::osfamily == 'Debian' {
  package { 'apache2': ensure => present }
  service { 'apache2': ensure => running, enable => true }
} else {
  # Handle other OS families or raise an error
  notify { 'Unsupported OS':
    message => "Cannot configure web server for OS family ${::osfamily}",
    level   => error,
  }
}
The `::` before `osfamily` indicates that it's a top-scope fact, accessible everywhere. Common facts like `$::ipaddress`, `$::hostname`, `$::memorysize` are invaluable for dynamic provisioning. You can also create custom facts if Facter doesn't provide the information you need.
Conditionals: Logic in Your Puppet Code
Puppet supports `if/else` statements and `case` statements, similar to traditional programming languages, allowing your manifests to behave differently based on conditions.
`if` and `elsif` Statements
if $environment == 'production' {
  # Apply production-specific configurations
  file { '/etc/app/config.prod.yaml':
    ensure => file,
    source => 'puppet:///modules/myapp/config.prod.yaml',
  }
} elsif $environment == 'staging' {
  # Apply staging-specific configurations
  file { '/etc/app/config.stage.yaml':
    ensure => file,
    source => 'puppet:///modules/myapp/config.stage.yaml',
  }
} else {
  # Default or development configurations
  file { '/etc/app/config.dev.yaml':
    ensure => file,
    source => 'puppet:///modules/myapp/config.dev.yaml',
  }
}
`case` Statements
`case` statements are often cleaner when you have multiple discrete conditions based on a single variable.
case $::operatingsystem {
  'CentOS', 'RedHat': {
    package { 'vim-enhanced': ensure => present }
  }
  'Ubuntu', 'Debian': {
    package { 'vim': ensure => present }
  }
  default: {
    notify { 'unsupported_vim':
      message => "Vim package not explicitly defined for ${::operatingsystem}",
      level   => warning,
    }
  }
}
Using facts with conditionals makes your Puppet code remarkably flexible and resilient, allowing it to adapt to diverse infrastructure requirements. This is a core competency taught in any practical "Puppet Part3 DEVOPS ONLINE TRAINING."
Puppet Agent-Master Communication and Certificate Management
Jab tum Puppet ko production mein use karte ho, toh agent-master architecture sabse common hai. Yahan pe ek Puppet Master server hota hai jo centralized control provide karta hai, aur baki machines par Puppet Agents run karte hain.
The Agent-Master Workflow: How It All Connects
1. **Agent Startup**: The Puppet agent starts on a client machine.
2. **Request Certificate**: The agent attempts to connect to the master and requests a certificate.
3. **Certificate Signing**: The master receives the request. An administrator (or an automated process) must *sign* this certificate on the master. This is a critical security step – only authorized agents can communicate.
* On the master:
* `puppet cert list --all` (to see pending and signed certificates)
* `puppet cert sign
` (to sign a specific agent's certificate)
* `puppet cert sign --all` (to sign all pending certificates – use with caution in production)
4. **Certificate Retrieval**: After signing, the agent fetches its signed certificate.
5. **Catalog Request**: The agent sends its facts (collected by Facter) to the master.
6. **Catalog Compilation**: The master compiles a "catalog" for that specific agent. The catalog is a JSON document detailing the desired state of all resources on that agent, based on your Puppet manifests, node definitions, facts, and Hiera data.
7. **Configuration Enforcement**: The agent receives its catalog and enforces the desired state by applying the necessary changes to the system.
8. **Report Submission**: The agent sends a report back to the master detailing what changes were made (or if no changes were needed).
This entire cycle typically runs every 30 minutes by default, ensuring continuous configuration enforcement.
Setting Up a Puppet Agent (Client Machine)
On your client machine (the agent), the basic steps are:
1. **Install Puppet Agent**:
    # For Debian/Ubuntu
    wget https://apt.puppet.com/puppet-release-$(lsb_release -cs).deb
    sudo dpkg -i puppet-release-$(lsb_release -cs).deb
    sudo apt update
    sudo apt install puppet-agent

    # For RHEL/CentOS
    sudo yum install https://yum.puppet.com/puppet-release-el-7.noarch.rpm # For EL7
    # For EL8: sudo yum install https://yum.puppet.com/puppet-release-el-8.noarch.rpm
    sudo yum install puppet-agent
2. **Configure Puppet Agent to point to Master**:
Edit `/etc/puppetlabs/puppet/puppet.conf` on the agent:
    [main]
    certname = <AGENT_HOSTNAME> # e.g., web01.example.com
    server = <PUPPET_MASTER_HOSTNAME_OR_IP> # e.g., puppet.example.com
    environment = production # or whatever environment you're using

    [agent]
    # Optionally, specify runinterval (default is 30m)
    # runinterval = 30m
Make sure your agent can resolve the master's hostname. Add an entry to `/etc/hosts` if DNS isn't set up.
3. **Start and Enable Puppet Agent Service**:
    sudo systemctl start puppet
    sudo systemctl enable puppet
4. **Initial Agent Run to Request Certificate**:
sudo /opt/puppetlabs/bin/puppet agent -t
This command attempts to contact the master, sends its certificate signing request (CSR), and tries to fetch its catalog. It will likely fail the first time, waiting for the certificate to be signed.
Certificate Management on Puppet Master
On the Puppet Master server:
1. **List Pending Certificate Requests**:
sudo /opt/puppetlabs/bin/puppet cert list
You will see output like:
"web01.example.com" (SHA256) A1B2C3D4...
2. **Sign the Agent's Certificate**:
sudo /opt/puppetlabs/bin/puppet cert sign web01.example.com
Once signed, the agent can successfully retrieve its certificate and proceed with catalog compilation and enforcement on its next run.
3. **Verify Agent Run**:
Run `sudo /opt/puppetlabs/bin/puppet agent -t` again on the agent. This time, it should connect, get a catalog, and apply configurations.
Understanding this entire handshake process, certificate signing, and common troubleshooting steps (like `puppet agent -t --debug` for verbose output) is absolutely vital for managing a Puppet environment effectively. This is where a hands-on "Puppet Part3 DEVOPS ONLINE TRAINING" truly empowers you.
Related: Mastering Data Separation with Hiera in Puppet
Puppet Best Practices for Maintainable DevOps
Jab itna kuch seekh liya hai, toh best practices bhi jaan lo. Yeh woh baatein hain jo tumhari Puppet journey ko smooth banayengi.
1. **Modularize Everything**: Break down your configuration into small, reusable modules. Never put all your code in `site.pp`.
2. **Use Parameters for Flexibility**: Make your classes configurable with parameters. This allows for reuse across different environments and node types.
3. **Leverage Facter for Dynamic Configuration**: Avoid hardcoding values. Use facts to make your Puppet code adaptive to the node's specific characteristics.
4. **Hiera for Data Separation**: Don't embed configuration data directly in your manifests. Use Hiera to separate data from code, making it easier to manage environment-specific values (development, staging, production). This is a big deal for large deployments.
5. **Test Your Code**: Use tools like `puppet-lint` for style checks, `rspec-puppet` for unit testing your modules, and `puppet apply --noop` for dry runs before applying changes to production.
6. **Version Control Your Puppet Code**: Treat your Puppet code like application code. Store it in Git, use branches, pull requests, and code reviews.
7. **Small, Incremental Changes**: Avoid making large, sweeping changes. Break them down into smaller, manageable chunks that are easier to test and revert if necessary.
8. **Idempotency is Key**: Always write Puppet code that achieves a desired state, not just executes a command. Running the same Puppet code multiple times should produce the same result without unintended side effects.
9. **Clear Documentation**: Document your modules and classes, especially parameters and expected behavior. Future you (or your teammates) will thank you.
Explore further: Simplifying Infrastructure with Puppet Roles and Profiles
mastering Puppet is about more than just syntax; it's about adopting a mindset of automation, consistency, and intelligent infrastructure management. Yeh sab, aur isse bhi zyada, ek comprehensive "Puppet Part3 DEVOPS ONLINE TRAINING" mein cover hota hai.
Key Takeaways
- Puppet's idempotent nature ensures systems maintain a "desired state," crucial for scalable and consistent infrastructure in DevOps.
- Organizing Puppet code into well-structured **modules** containing **classes** is fundamental for maintainability, reusability, and managing complex configurations.
- Deep understanding of core **resource types** like `file`, `package`, `service`, and `user`, along with their attributes and dependencies, is essential for writing effective Puppet manifests.
- **Variables**, **Facter (facts)**, and **conditionals** (if/else, case) enable dynamic and adaptive configurations, allowing Puppet code to respond to system-specific information and environment differences.
- Establishing secure **agent-master communication** through certificate management is a critical step for centralizing Puppet control and automating client node configurations.
Frequently Asked Questions
What are Puppet modules and why are they important in DevOps?
Puppet modules are self-contained, reusable units of Puppet code that organize manifests, templates, files, and plugins. They are crucial in DevOps because they allow engineers to structure their configurations logically, promote code reuse across different systems and environments, and simplify the management of complex infrastructures. Instead of monolithic code, modules break down configurations into manageable, testable components.
How do Puppet facts (Facter) enhance configuration management?
Puppet facts, gathered by Facter, provide system-specific information (like OS type, IP address, CPU count) about the node Puppet is running on. They enhance configuration management by allowing Puppet manifests to be dynamic and adaptive. Instead of writing separate configurations for every OS or hardware variant, you can use facts with conditional logic to create a single, intelligent manifest that configures systems differently based on their unique characteristics, improving flexibility and reducing code duplication.
What is the difference between `require` and `subscribe` in Puppet resources?
Both `require` and `subscribe` establish dependencies between Puppet resources, but their behavior differs. `require` creates a proactive dependency, ensuring that the required resource is *managed before* the current resource. If the required resource fails, the current resource won't be managed. `subscribe`, on the other hand, creates a reactive dependency. If the subscribed resource changes, the current resource will be *refreshed or restarted*. For example, a `service` might `subscribe` to a `file` resource, so if the configuration file changes, the service automatically restarts.
How do I set up a Puppet agent to connect to a master?
To set up a Puppet agent: first, install the `puppet-agent` package on the client machine. Then, configure `/etc/puppetlabs/puppet/puppet.conf` by setting `certname` to the agent's hostname and `server` to the Puppet master's hostname or IP. Ensure the agent can resolve the master's hostname. Finally, start and enable the Puppet service, and run `sudo /opt/puppetlabs/bin/puppet agent -t` to send a certificate signing request (CSR) to the master. An administrator must then sign this certificate on the master using `puppet cert sign ` before the agent can successfully fetch its catalog and apply configurations.
This journey into Puppet is just a glimpse of what's possible when you truly master this powerful configuration management tool. To get a hands-on experience and witness these concepts in action, make sure to check out the original "Puppet Part3 DEVOPS ONLINE TRAINING" video on the @explorenystream channel. It's an invaluable resource for both beginners and those looking to deepen their understanding of Puppet in a practical DevOps context. Don't forget to like, share, and subscribe for more such in-depth training content!