🚀 Terraform Demo | Step-by-Step Guide to Infrastructure as Code (IaC)
July 10, 2026 — LiveStream
🛒 Recommended gear on AmazonDisclosure: some links above are affiliate links — if you buy through them I may earn a small commission at no extra cost to you. Thanks for supporting the channel!
As an Amazon Associate I earn from qualifying purchases.
Managing cloud infrastructure manually can feel like a never-ending game of whack-a-mole, especially as your systems scale. But what if you could define, provision, and manage your entire cloud environment with simple, human-readable code? Welcome to the world of Infrastructure as Code (IaC), and specifically, to a comprehensive Terraform demo that unravels its magic step-by-step, transforming how you approach cloud automation.
This deep dive isn't just a summary; it's a full-fledged guide, building upon the foundations of modern DevOps practices to show you exactly how to wield Terraform for robust, repeatable, and resilient infrastructure. We'll explore the core concepts, walk through a practical workflow, and equip you with the knowledge to make Terraform an indispensable tool in your arsenal.
Infrastructure as Code (IaC): The DevOps Superpower
Yaar, remember those days when provisioning servers meant logging into a cloud console, clicking around, maybe running a script or two, and then hoping for the best? Each environment (dev, staging, prod) became its own unique snowflake, prone to inconsistencies and manual errors. That’s where Infrastructure as Code (IaC) swoops in, turning infrastructure management from an artisanal craft into an engineering discipline.
IaC means defining your infrastructure – think virtual machines, networks, databases, load balancers – using configuration files, rather than through manual processes. These files are treated just like application code: version-controlled, testable, and deployable through automated pipelines. This approach brings a ton of benefits:
- Consistency: No more "works on my machine" for infrastructure. Every environment spun up from the same code will be identical.
- Repeatability: Need to spin up a new test environment? Just run your IaC scripts. It’s an idempotent process, meaning running it multiple times yields the same result.
- Speed and Efficiency: Automating infrastructure provisioning dramatically reduces deployment times and frees up engineers from repetitive tasks.
- Reduced Risk: Fewer manual steps mean fewer human errors. Plus, changes are reviewed and version-controlled, providing a clear audit trail.
- Cost Optimization: Efficient provisioning and easier teardown of resources can prevent unnecessary cloud spending.
There are several tools in the IaC landscape, like CloudFormation, Ansible, Puppet, and Chef. But with multi-cloud provisioning and managing the lifecycle of resources from creation to destruction, HashiCorp Terraform stands out as a true leader. It’s cloud-agnostic, supporting a vast ecosystem of providers (AWS, Azure, GCP, VMware, Kubernetes, etc.), making it a versatile choice for any organization navigating hybrid or multi-cloud strategies.
What Makes Terraform Tick? Understanding the Core Concepts
Terraform uses its own declarative language called HashiCorp Configuration Language (HCL). Don't worry, it's pretty intuitive and human-readable, designed to describe infrastructure in a clear, concise manner. Unlike imperative tools (like Ansible, which defines *how* to achieve a state), Terraform is declarative, meaning you describe the *desired state* of your infrastructure, and Terraform figures out *how* to get there.
Let's break down some fundamental Terraform concepts, because understanding these building blocks is key to mastering any Terraform demo:
-
Providers: These are plugins that Terraform uses to interact with various cloud services or APIs. For example, the
aws provider allows Terraform to manage AWS resources, while the azurerm provider does the same for Azure. Without a provider, Terraform wouldn't know how to talk to your cloud.
provider "aws" {
  region = "us-east-1"
}
-
Resources: This is the bread and butter of Terraform. A
resource block describes one or more infrastructure objects, like an AWS EC2 instance, an S3 bucket, a VPC, or a Kubernetes deployment. Each resource has a type (e.g., aws_instance) and a local name you assign (e.g., my_web_server).
resource "aws_instance" "my_web_server" {
  ami           = "ami-0abcdef1234567890" # Example AMI ID
  instance_type = "t2.micro"
  tags = {
    Name = "WebServer"
  }
}
-
Data Sources: Sometimes, you don't want to *create* a resource but rather *query* information about an existing one. That's where data sources come in. For instance, you might use a data source to fetch the latest Amazon Machine Image (AMI) ID or details about an existing VPC.
data "aws_ami" "ubuntu" {
  most_recent = true
  owners      = ["099720109477"] # Canonical
  filter {
    name   = "name"
    values = ["ubuntu/images/hvm-ssd/ubuntu-focal-20.04-amd64-server-*"]
  }
}
-
Variables: To make your configurations reusable and dynamic, Terraform allows you to define input variables. These can be used for things like instance types, region names, or environment-specific settings. You can pass values to them via the command line, environment variables, or
.tfvars files.
variable "instance_type" {
  description = "The EC2 instance type"
  type        = string
  default     = "t2.micro"
}
-
Outputs: Once Terraform provisions resources, you often need to retrieve certain attributes, like the public IP of an EC2 instance or the ARN of an S3 bucket. Output values display this information after an apply and can be consumed by other Terraform configurations or CI/CD pipelines.
output "instance_public_ip" {
  description = "The public IP address of the EC2 instance"
  value       = aws_instance.my_web_server.public_ip
}
-
State: This is perhaps one of the most critical aspects. Terraform maintains a state file (
terraform.tfstate) that maps the real-world resources to your configuration. It tracks what Terraform has provisioned, its attributes, and its dependencies. This state file is crucial for Terraform to understand what changes need to be made during subsequent runs (plan, apply). We'll talk more about remote state soon, jo bahut important hai.
The Terraform Workflow: A Step-by-Step Guide to Infrastructure Provisioning
Now that we've covered the basics, let's walk through a typical Terraform workflow, just like you'd see in a practical Terraform demo. We'll provision a simple AWS EC2 instance, demonstrating each command and concept along the way.
Step 0: Prerequisites and Setup
Before you even write your first HCL, you need a few things in place:
-
Install Terraform: Download and install Terraform from the official HashiCorp website. Make sure it's in your system's PATH. You can verify with
terraform --version.
-
Cloud Provider Account: For this example, an AWS account is needed.
-
Configure AWS CLI: Ensure your AWS credentials are set up. Terraform uses these credentials to interact with your AWS account. The easiest way is to use
aws configure to set your Access Key ID, Secret Access Key, region, and output format. Alternatively, you can use environment variables (AWS_ACCESS_KEY_ID, AWS_SECRET_ACCESS_KEY) or IAM roles.
Step 1: Define Your Infrastructure (.tf files)
This is where you write your HCL code. Create a new directory for your project (e.g., my-ec2-infra) and inside it, create a file named main.tf. This file will contain the primary definition of your AWS resources.
Let's define a provider, a data source to fetch the latest Ubuntu AMI, and an EC2 instance.
# main.tf

# Define the AWS provider and region
provider "aws" {
  region = "us-east-1" # You can change this to your preferred region
}

# Data source to fetch the latest Ubuntu 20.04 LTS AMI
data "aws_ami" "ubuntu" {
  most_recent = true
  owners      = ["099720109477"] # Canonical
  filter {
    name   = "name"
    values = ["ubuntu/images/hvm-ssd/ubuntu-focal-20.04-amd64-server-*"]
  }
  filter {
    name   = "virtualization-type"
    values = ["hvm"]
  }
}

# Resource: AWS EC2 Instance
resource "aws_instance" "web_server_instance" {
  ami           = data.aws_ami.ubuntu.id # Use the ID from the data source
  instance_type = "t2.micro"
  key_name      = "my-ssh-key" # IMPORTANT: Replace with an existing EC2 Key Pair name in your AWS account
  # If you don't have a key pair, you can either create one manually or via Terraform
  # For a quick demo, manual creation is simpler.

  tags = {
    Name        = "MyWebServerDemo"
    Environment = "Dev"
    ManagedBy   = "Terraform"
  }

  # Example of associating a security group (optional for basic demo, but good practice)
  # Replace with an existing security group ID or create one with Terraform
  # vpc_security_group_ids = ["sg-0abcdef1234567890"]

  user_data = <<-EOF
              #!/bin/bash
              sudo apt update -y
              sudo apt install -y apache2
              sudo systemctl start apache2
              sudo systemctl enable apache2
              echo "Hello from Terraform provisioned EC2!" | sudo tee /var/www/html/index.html
              EOF
}

# Output the public IP address of the instance
output "web_server_public_ip" {
  description = "The public IP address of the web server instance"
  value       = aws_instance.web_server_instance.public_ip
}

# Output the public DNS of the instance
output "web_server_public_dns" {
  description = "The public DNS name of the web server instance"
  value       = aws_instance.web_server_instance.public_dns
}
Acha, a quick note on key_name: For this to work, you absolutely need an SSH key pair already created in your AWS region. If you don't have one, either create it manually in the EC2 console or, for a more advanced Terraform demo, define an aws_key_pair resource in your main.tf.
Step 2: Initialize Your Working Directory (terraform init)
Once your configuration files are ready, navigate to your project directory in your terminal and run the terraform init command.
cd my-ec2-infra
terraform init
What does this command do? It performs several initialization steps:
- Downloads Providers: Terraform scans your configuration for provider requirements (like
aws) and downloads the necessary plugins.
- Backend Setup: It sets up the backend for your Terraform state file. By default, this is a local file (
terraform.tfstate), but in production, you'd use a remote backend like AWS S3 with DynamoDB for state locking, which we'll discuss.
- Module Installation: If you're using any Terraform modules, it downloads those as well.
You should see a message like "Terraform has been successfully initialized!".
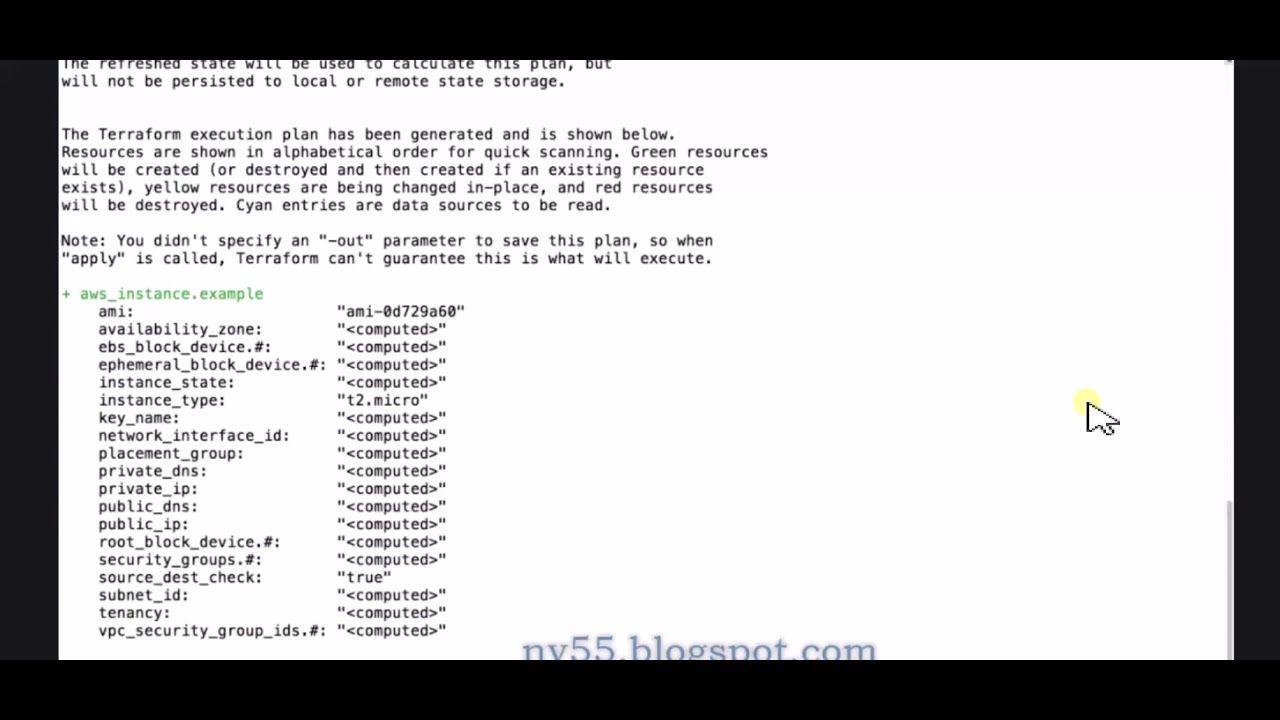
Step 3: Preview Changes (terraform plan)
Before applying any changes, it's always, ALWAYS a good idea to see what Terraform *intends* to do. The terraform plan command does exactly this.
terraform plan
Terraform compares your desired state (in your .tf files) with the current state of your infrastructure (read from the cloud provider and the state file). It then outputs a detailed execution plan, showing you what resources will be added, changed, or destroyed. This is your safety net, allowing you to review changes before they're actually made.
You'll see output indicating it will "add" one resource (your aws_instance.web_server_instance). Dekho, this plan is crucial for avoiding surprises!
Step 4: Apply Changes (terraform apply)
Once you're satisfied with the plan, it's time to provision your infrastructure. Run terraform apply.
terraform apply
Terraform will once again show you the execution plan and then prompt you to confirm by typing yes. This final confirmation step is another safeguard. After you confirm, Terraform will start provisioning the resources in your AWS account. This might take a few minutes as AWS provisions the EC2 instance, installs Apache, etc.
Upon successful completion, Terraform will output the values defined in your outputs.tf (or main.tf in our case), like the public IP and DNS of your EC2 instance.
Apply complete! Resources: 1 added, 0 changed, 0 destroyed.

Outputs:

web_server_public_dns = "ec2-XX-XX-XX-XX.compute-1.amazonaws.com"
web_server_public_ip = "XX.XX.XX.XX"
You can now try accessing the public IP or DNS in your browser. You should see "Hello from Terraform provisioned EC2!". Mast, right?
Step 5: Managing Terraform State (Remote State with S3 Backend)
Now, let's talk about that crucial state file. By default, terraform.tfstate lives locally. This is fine for personal demos, but in a team environment, it's a huge problem. Why? Because:
- Collaboration: If multiple people are running Terraform, whose state is authoritative?
- Security: The state file can contain sensitive information, even if masked.
- Durability: If your local machine crashes, you lose your infrastructure's state.
The solution is remote state. The most common and recommended approach for AWS is to store the state file in an S3 bucket, often coupled with DynamoDB for state locking (to prevent concurrent modifications). This ensures your state is centralized, secure, and accessible to your entire team.
To configure an S3 backend:
-
Create an S3 Bucket: Manually (or via a separate Terraform config) create an S3 bucket (e.g.,
my-terraform-state-bucket-12345) and optionally a DynamoDB table (e.g., my-terraform-state-lock with a primary key LockID).
-
Update
main.tf: Add a terraform block at the top of your main.tf (or in a new versions.tf file) to configure the backend.
# In your main.tf (or versions.tf)

terraform {
  required_providers {
    aws = {
      source  = "hashicorp/aws"
      version = "~> 5.0"
    }
  }

  backend "s3" {
    bucket         = "my-terraform-state-bucket-12345" # Your unique S3 bucket name
    key            = "dev/web-server/terraform.tfstate" # Path to your state file within the bucket
    region         = "us-east-1"
    encrypt        = true                             # Encrypt the state file at rest
    dynamodb_table = "my-terraform-state-lock"        # Your DynamoDB table for state locking
  }
}

# Rest of your configuration (provider, data sources, resources, outputs) follows here...
-
Re-initialize: Run
terraform init again. Terraform will detect the backend configuration and offer to migrate your existing local state to the remote S3 bucket. Type yes to confirm.
terraform init
Now, your state is safely stored in S3, making your infrastructure management collaborative and robust. This is a non-negotiable best practice for any serious Infrastructure as Code setup!
For more detailed information on setting up remote state, you can refer to HashiCorp's guide on Terraform state management.
Step 6: Destroy Infrastructure (terraform destroy)
When you no longer need the resources, it's just as easy to tear them down as it was to provision them. The terraform destroy command cleans up everything managed by your current Terraform configuration.
terraform destroy
Similar to apply, Terraform will show you a plan of all the resources it will destroy and ask for confirmation. Type yes to proceed. This is incredibly useful for ephemeral environments, testing, or cleaning up after a demo. It ensures you don't leave zombie resources running and incurring costs.
Always use destroy with caution, especially in production environments! Double-check your plan!
Advanced Terraform Concepts and Best Practices
Once you're comfortable with the basic workflow, you'll want to explore more advanced techniques to manage complex infrastructure.
Modules for Reusability
Just like functions in programming, Terraform Modules allow you to encapsulate and reuse common infrastructure patterns. Instead of copy-pasting EC2 instance definitions across projects, you create a module for a "web server" that takes variables (like instance type, AMI, key pair) and provisions the server and its associated resources (security groups, EBS volumes).
This promotes consistency, reduces boilerplate, and makes your configurations easier to manage and update. You can use modules from the Terraform Registry or create your own local or remote modules.
Workspaces for Environment Isolation
If you need to manage multiple distinct environments (dev, staging, prod) using the *same* Terraform configuration, Workspaces are your friend. A workspace essentially creates a separate state file within the same backend, allowing you to deploy the same code to different environments without modifying your configuration files. This is often an alternative to duplicating entire directories for each environment.
terraform workspace new dev
terraform workspace select dev
terraform apply -var="env=dev" # Example of using a variable for environment-specific settings
Version Control Your Configuration
Treat your Terraform code like any other application code. Store it in a Git repository (GitHub, GitLab, Bitbucket). This provides:
- History: Track every change made to your infrastructure.
- Collaboration: Teams can work on infrastructure definitions concurrently.
- Rollbacks: Easily revert to previous stable infrastructure states.
- Code Reviews: Peer review infrastructure changes before deployment.
CI/CD Integration
The true power of IaC comes when integrated into your Continuous Integration/Continuous Deployment (CI/CD) pipelines. Tools like Jenkins, GitLab CI, GitHub Actions, or AWS CodePipeline can automate terraform plan and terraform apply steps, ensuring that infrastructure changes are consistently deployed after successful code reviews and tests.
This enables a fully automated DevOps pipeline, from code commit to infrastructure provisioning and application deployment.
Immutable Infrastructure
Embrace the philosophy of immutable infrastructure. Instead of updating or patching existing servers, deploy new, freshly configured instances and then gracefully decommission the old ones. Terraform excels at this. If you need to change an instance's configuration (e.g., update user data), Terraform will often detect this and propose to destroy and recreate the instance, ensuring a clean slate.
This approach reduces configuration drift, simplifies scaling, and improves reliability, because you’re always starting from a known good state.
Common Pitfalls and How to Avoid Them
While Terraform is powerful, it's not without its quirks. As a senior DevOps engineer, I've seen juniors (and sometimes even seniors!) stumble. Here are some common pitfalls and tips to avoid them:
-
State File Mishaps:
- Losing the State File: If you lose your
terraform.tfstate and don't have a remote backend, Terraform loses track of your resources. This means manual intervention to manage or destroy resources, which is a big headache. Solution: Always use a robust remote backend like S3 with DynamoDB.
- Concurrent State Access: Two people running
terraform apply simultaneously on the same state can lead to corruption or unexpected results. Solution: State locking (provided by DynamoDB with S3 backend) prevents this by ensuring only one operation can modify the state at a time.
-
Hardcoding Sensitive Information: Never hardcode sensitive data like API keys, database passwords, or secret access keys directly in your
.tf files.
Solution: Use Terraform's built-in variable definitions, environment variables, or better yet, integrate with secret management tools like AWS Secrets Manager, HashiCorp Vault, or encrypted .tfvars files. Terraform Cloud also offers secure variable management.
-
Ignoring
terraform plan Output: Rushing to terraform apply without carefully reviewing the plan is a recipe for disaster. You might accidentally destroy critical resources.
Solution: Always, always, ALWAYS review the plan. Understand every + (add), ~ (change), and especially - (destroy).
-
Lack of Modularity: Throwing all your resources into a single, massive
main.tf file quickly becomes unmanageable.
Solution: Break down your infrastructure into logical modules. For example, a module for VPC, another for EC2 instances, another for RDS databases. This makes your code cleaner, easier to understand, and reusable.
-
Configuration Drift: When manual changes are made to infrastructure outside of Terraform, it leads to "drift." Terraform's state file no longer accurately reflects the real-world configuration.
Solution: Enforce strict policies against manual changes. Periodically run
terraform plan to detect drift, and integrate Terraform into CI/CD to make it the single source of truth for infrastructure changes.
-
Not Using Version Constraints: Forgetting to pin provider and module versions can lead to unexpected behavior when new, potentially breaking, changes are introduced in future versions.
Solution: Always specify version constraints for your providers and modules in your
terraform block and module definitions (e.g., version = "~> 5.0").
By being mindful of these common pitfalls and adopting best practices, you can ensure a smoother, more reliable Infrastructure as Code journey with Terraform. Trust me, it saves a lot of headaches in the long run!
Key Takeaways from Your Terraform Demo Journey
So, there you have it, an exhaustive walkthrough of Terraform, from its foundational concepts to a practical, step-by-step demo. Here are the key takeaways to remember:
- IaC is Transformative: Infrastructure as Code, powered by Terraform, is fundamental for modern, scalable, and reliable cloud operations, offering consistency, speed, and reduced risk.
- HCL is Declarative: Terraform uses HCL to describe the desired state of your infrastructure, letting Terraform figure out the "how."
- The Core Workflow: Understand and diligently follow the
init, plan, apply, and destroy commands. Always review the plan!
- State Management is Critical: Never underestimate the importance of Terraform's state file. Always use a remote backend (like S3 with DynamoDB) for collaboration, security, and durability.
- Best Practices for Scale: Leverage modules for reusability, workspaces for environment isolation, version control your code, and integrate Terraform into your CI/CD pipelines.
- Avoid Common Pitfalls: Be vigilant about state file issues, sensitive data, unreviewed plans, and configuration drift to ensure a smooth IaC experience.
Mastering Terraform empowers you to manage complex cloud environments with confidence and precision. It moves you from manual, error-prone tasks to automated, repeatable, and scalable infrastructure provisioning. The journey from a junior to a senior DevOps engineer often involves truly understanding and implementing tools like this. For deeper insights into cloud automation and continuous delivery, explore resources like our guide on Continuous Delivery best practices.
Frequently Asked Questions
What is Terraform and why is it important for DevOps?
Terraform is an open-source Infrastructure as Code (IaC) tool developed by HashiCorp. It allows you to define and provision cloud and on-prem resources using a high-level configuration language (HCL). For DevOps, Terraform is crucial because it automates infrastructure provisioning, ensures consistency across environments, facilitates collaboration, reduces manual errors, and speeds up deployment cycles, making infrastructure management an integral part of the software delivery pipeline.
What is the difference between Terraform and Ansible?
While both are automation tools, they operate at different layers. Terraform is primarily a provisioning tool focused on creating, managing, and destroying infrastructure resources (like VMs, networks, databases) at the IaaS layer. It's declarative, defining the desired end-state. Ansible, on the other hand, is a configuration management tool used for installing software, managing services, and orchestrating deployments *within* already provisioned infrastructure. It's often imperative, defining a sequence of steps. They complement each other: Terraform provisions the servers, and Ansible configures the software on them.
Is Terraform cloud-agnostic?
Yes, Terraform is largely cloud-agnostic. It supports a vast array of cloud providers (AWS, Azure, Google Cloud Platform, Oracle Cloud, Alibaba Cloud), on-premise solutions (VMware vSphere, OpenStack), and SaaS providers (Kubernetes, Datadog, Cloudflare) through its extensive plugin architecture of "providers." This multi-cloud capability is one of its strongest selling points, allowing engineers to use a single workflow to manage infrastructure across diverse platforms without learning multiple proprietary tools.
Can Terraform manage existing infrastructure?
Absolutely! Terraform can "import" existing infrastructure into its state file using the terraform import command. This allows you to bring previously manually provisioned resources under Terraform's management. Once imported, Terraform can then manage, update, or destroy these resources based on your configuration files. This is a powerful feature for organizations looking to adopt IaC for their legacy or existing cloud environments.
If you're eager to see these concepts in action and get a visual walkthrough, make sure to watch the full Terraform Demo | Step-by-Step Guide to Infrastructure as Code (IaC) video on @explorenystream. It’s an excellent companion to this article, bringing these commands and concepts to life. Don't forget to hit that subscribe button for more insightful DevOps content!