
Net Backup 7 5 client installation on linux Information & Technology
July 23, 2026 — LiveStream
▶ Net Backup 7 5 client installation on linux Information & Technology | Subscribe to @explorenystream
In the world of enterprise IT, safeguarding critical data is paramount. This guide provides a comprehensive, deep dive into Net Backup 7.5 client installation on Linux, a crucial step for ensuring robust data protection and disaster recovery strategies for your Linux-based servers. We'll walk you through the entire process, from prerequisites to troubleshooting, making sure your Veritas NetBackup client setup on Linux is solid and secure.
Bhai, when you’re managing servers in a large organization, data loss is not an option. Period. That’s where enterprise-grade backup solutions like Veritas NetBackup come into play. It’s not just about copying files; it's about protecting mission-critical applications, databases, and operating systems against all sorts of unforeseen disasters – hardware failures, accidental deletions, or even cyber threats. And for your precious Linux servers, installing the NetBackup client is the first, most critical step to bring them under the umbrella of your corporate backup policy. Dekho, the video from @explorenystream provides a good visual walkthrough, but let's sit down with a cup of chai and really understand the nitty-gritty, the why and the how, in detail. We'll focus on Net Backup 7.5 client installation on Linux, a version that laid much of the groundwork for what we see in newer releases today, so understanding it is foundational.
Understanding Enterprise Data Protection with NetBackup
First things first, what exactly is NetBackup and why is it so widely used in large enterprises? Simply put, NetBackup is a software suite from Veritas (previously Symantec) designed for centralized, large-scale data backup and recovery. It’s not just for small setups; it’s built to handle petabytes of data across thousands of servers, virtual machines, and cloud instances. Think of it as the ultimate safety net for your digital assets.
The Architecture at a Glance (Very Important Concept, Bhai!)
A typical NetBackup environment consists of three main components:
- Master Server: This is the brain of your NetBackup domain. It manages backup policies, schedules, media catalogs, and recovery operations. Every backup or restore job goes through the Master Server.
- Media Server: These servers are responsible for managing the actual backup devices (tape drives, disk storage, cloud storage) and writing/reading data to/from them. They act as data movers, offloading the heavy lifting from the Master Server.
- Client: This is the software component that you install on the server you want to protect – in our case, your Linux machine. The client software interacts with the Media Server to send data for backup and receive data for restoration.
Why a NetBackup Client on Linux?
Linux servers are the backbone of modern IT infrastructure. They host web servers, database servers, application servers, and critical development environments. Protecting the data on these servers is non-negotiable. Without a NetBackup client installed on your Linux machine, your Master Server simply cannot see or interact with that machine for backup purposes. The client acts as an agent, providing the necessary communication layer and data access for NetBackup to perform its magic.
When you perform a Veritas NetBackup client setup on Linux, you’re essentially enabling that server to communicate securely with your NetBackup infrastructure. This allows you to:
- Schedule Automated Backups: Set up policies to automatically back up files, directories, or even entire file systems at regular intervals.
- Perform Granular Restores: Restore individual files, specific directories, or an entire server state.
- Ensure Consistency: Integrate with applications (like databases using their specific agents) to ensure application-consistent backups, which is crucial for data integrity.
- Centralized Management: Manage all your Linux server backups from a single NetBackup console.
NetBackup 7.5 – Still Relevant for Foundational Understanding
While NetBackup has evolved significantly since version 7.5, the core principles of client installation remain largely consistent. Understanding 7.5 provides a strong foundation for working with newer versions. It was a robust release, supporting a wide range of Linux distributions and offering solid performance for its time. We’ll focus on the specifics of this version for our installation guide, which is a great starting point for any junior DevOps engineer.
The A to Z of Net Backup 7.5 Client Installation on Linux
Alright, let’s roll up our sleeves. Installing the NetBackup 7.5 client on Linux isn't rocket science, but it requires attention to detail. Follow these steps meticulously, aur tumhara client ekdam mast chalega.
Preparation is Key, Bhai: Prerequisites and Pre-installation Checks
Before you even think about running an installer, proper preparation can save you hours of troubleshooting later. Trust me on this one, yeh ekdum important hai.
- System Requirements Verification:
- Operating System: Ensure your Linux distribution (RHEL, CentOS, SLES, Ubuntu, etc.) and its version are officially supported by NetBackup 7.5. Check the Veritas NetBackup Compatibility List for exact details. A mismatch here is a major headache.
- Hardware: Minimum CPU, RAM, and disk space. Typically, a few GBs of free disk space are needed for the client software and logs.
- Kernel Version: Sometimes specific kernel versions are required or explicitly unsupported. Verify this.
- Network Connectivity:
- Name Resolution: The Linux client *must* be able to resolve the hostname of your NetBackup Master Server and Media Servers, and vice-versa. This is often the root cause of many issues.
- Check `/etc/hosts` for correct entries.
- Verify DNS resolution:
ping your_master_server_hostnameandnslookup your_master_server_hostname. Ensure the IP addresses match.
- Firewall Rules: Ensure the necessary ports are open. By default, NetBackup uses port 1556 (for `bpcd` daemon), and VNETD (Port 13724) for communication. You might also need to open ports for PBX (Port 13782) and specific ports for certain application agents.
- Use
sudo firewall-cmd --add-port=1556/tcp --permanent(for firewalld) or edit `/etc/sysconfig/iptables` (for iptables). - Don't forget to reload/restart your firewall service after making changes!
- Use
- Name Resolution: The Linux client *must* be able to resolve the hostname of your NetBackup Master Server and Media Servers, and vice-versa. This is often the root cause of many issues.
- Root Access: You'll need root privileges to install and configure the NetBackup client. Use
sudo su -or perform all commands withsudo. - Download Client Software:
- The NetBackup client software typically comes as an ISO image or a tarball. You’ll usually get this from your NetBackup Master Server (via a share) or from the Veritas support portal.
- Once downloaded, verify the integrity of the package using checksums (MD5/SHA256) if provided. This ensures the file wasn't corrupted during download.
The Installation Process (Step-by-Step for NetBackup 7.5)
Chalo, ab actual installation pe aate hain. Assuming you have the NetBackup client package (e.g., `NetBackup_7.5_Clients_Linux.tar.gz`) on your Linux server:
- Transfer and Extract the Package:
Transfer the client package to a temporary directory on your Linux server, say `/tmp`. Then extract it:
        sudo mkdir -p /tmp/nb_client_install

        sudo cp /path/to/NetBackup_7.5_Clients_Linux.tar.gz /tmp/nb_client_install/

        cd /tmp/nb_client_install/

        sudo tar -zxvf NetBackup_7.5_Clients_Linux.tar.gz
This will create a directory structure, typically `NetBackup_7.5_Clients_Linux/` or similar, containing the `client/` subdirectory.
- Navigate to the Client Directory:
Find the client installation script. It's usually under `client/linux/` or `client/linux/
/`. cd /tmp/nb_client_install/client/linux/If you see multiple subdirectories for different architectures (e.g., `x86`, `x86_64`), choose the one matching your system. For most modern Linux servers, it will be `x86_64`.
cd x86_64 - Run the Installation Script:
The installer script is typically named `install`.
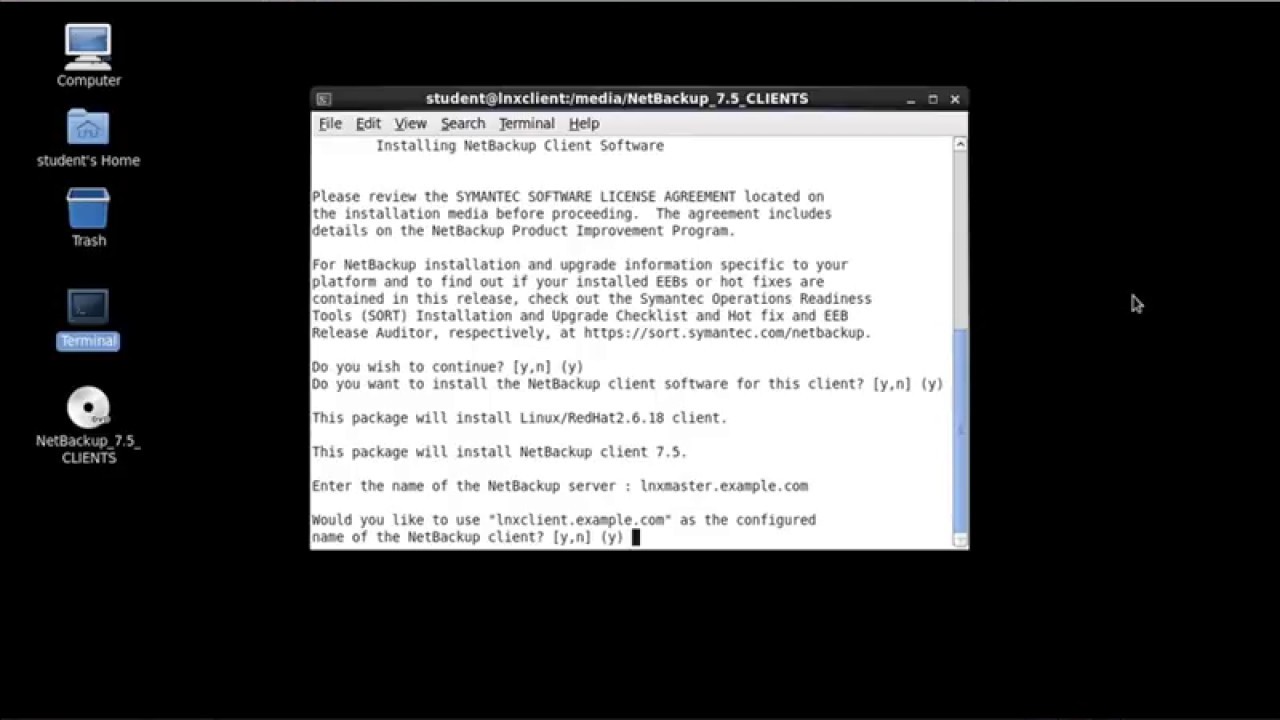
sudo ./installThe script will guide you through the installation. Pay close attention to the prompts:
- Welcome Message: Read through it.
- Do you wish to continue? (y/n) [y]: Type `y` and press Enter.
- Is this client going to be a NetBackup Client for a NetBackup Server (y/n) [y]: Type `y` and press Enter.
- Enter the name of the NetBackup master server: This is crucial. Enter the exact hostname of your NetBackup Master Server. Double-check for typos!
- Would you like to use "your_client_hostname" as the configured client name for this NetBackup client? (y/n) [y]: Usually, `y` is fine. If you need a different name (e.g., for virtual hosts or specific naming conventions), enter `n` and provide the desired client name.
- Are you ready to install NetBackup now? (y/n) [y]: Confirm with `y`.
The installer will then proceed to copy files, create directories, and set up the necessary services. This might take a few minutes.
- Post-Installation Configuration & Verification:
Installation is done, but our work isn't finished yet. We need to ensure everything is running correctly.
- Check NetBackup Processes:
After installation, NetBackup services should start automatically. You can verify this:
ps -ef | grep bpYou should see processes like `bpcd` (NetBackup Client Daemon), `vnetd` (Veritas Network Daemon), and `nbpxy` (NetBackup Proxy).
If services aren't running, you can manually start them:
sudo /usr/openv/netbackup/bin/bp.start_allTo stop them:
sudo /usr/openv/netbackup/bin/bp.kill_all - Test Connectivity to Master Server:
This command verifies if your client can communicate with the Master Server:
sudo /usr/openv/netbackup/bin/bptestbpcd -client your_client_hostname -host your_master_server_hostname -verboseLook for "connected to vnetd on your_master_server_hostname" and "connected to bpcd on your_master_server_hostname". If you see connection errors, recheck firewalls and name resolution.
- Verify Client Registration with Master Server:
On the NetBackup Master Server (via GUI or command line), you can check if the new client is visible:
From the Master Server command line:
bpclient -l -client your_client_hostnameThis should list details about your newly installed client. If it doesn't appear, you might need to add it manually (though the installer usually registers it):
bpclient -add -client your_client_hostname -master your_master_server_hostname - Initiate a Test Backup/Restore:
The ultimate verification! From the NetBackup Administration Console on the Master Server, create a simple backup policy targeting your new Linux client. Include a small directory for testing. Run the policy and observe the job status. If it completes successfully, congratulations! Your NetBackup 7.5 client installation on Linux is a success.
Similarly, try a simple file restore from that backup to ensure recovery also works.
- Check Log Files:
NetBackup is very verbose with its logging. If you encounter any issues, the logs are your best friend. The primary log directories are under `/usr/openv/netbackup/logs/` and `/usr/openv/logs/`. Key logs to check include:
- `/usr/openv/netbackup/logs/bpcd/log.
` - `/usr/openv/logs/vnetd/log.
` - `/usr/openv/netbackup/logs/bptm/log.
` (if media server is on client)
Use `tail -f` to monitor logs in real-time during troubleshooting.
- `/usr/openv/netbackup/logs/bpcd/log.
- Check NetBackup Processes:
Common Pitfalls and Troubleshooting NetBackup Client Issues
Ab dekho, installation hamesha sidha nahi hota. Sometimes, issues crop up. Knowing the common problems and how to approach them systematically is a mark of a good DevOps engineer. Don’t panic, bhai, we'll sort it out.
1. "Host Unknown" or Connectivity Problems
This is probably the most frequent issue. The client can't talk to the master/media server, or vice-versa.
- Symptom: Backup jobs fail with "host unknown," "connection refused," or similar errors. `bptestbpcd` fails.
- Troubleshooting:
- Name Resolution: Reconfirm `/etc/hosts` entries on both client and Master Server. Run `ping` and `nslookup` from both ends to ensure correct forward and reverse DNS lookups.
- Firewall: Ensure ports 1556, 13724 (VNETD), and 13782 (PBX) are open bi-directionally between the client and Master/Media servers. Use `netstat -tulnp | grep 1556` on the client to check if `bpcd` is listening.
- NetBackup Services: Ensure `bpcd`, `vnetd`, and `nbpxy` are running on the client. Use `ps -ef | grep bp` and restart if necessary (`bp.kill_all`, `bp.start_all`).
- `/usr/openv/netbackup/bp.conf`: This file on the client contains critical configuration. Make sure the `SERVER = your_master_server_hostname` entry is correct. Add `CLIENT_NAME = your_client_hostname` if not present.
2. Permissions Problems
Linux is all about permissions. Incorrect permissions can prevent NetBackup from accessing files or directories.
- Symptom: Backups fail for specific files/directories with "permission denied" errors.
- Troubleshooting:
- Ensure the NetBackup processes run with sufficient privileges (they usually run as root, but sometimes specific directories have restrictive ACLs).
- Check file system permissions on the data you're trying to back up.
- Verify SELinux or AppArmor status. If enabled and enforcing, they might restrict NetBackup operations. Temporarily setting SELinux to permissive mode (`setenforce 0`) can help diagnose if it's the culprit. If so, create appropriate SELinux policies.
3. Version Mismatch or Incompatibility
Trying to install an unsupported client version on a specific OS, or a client that's too old/new for the Master Server.
- Symptom: Installer fails, or client connects but backups fail immediately with version errors.
- Troubleshooting:
- Always consult the Veritas Hardware and Software Compatibility List (HCL) before starting.
- Ensure the client version is compatible with your Master Server version.
4. Disk Space Issues
Not enough space for the client software or temporary files during backup.
- Symptom: Installation fails, or backups fail with disk space errors.
- Troubleshooting:
- Check `df -h` to ensure sufficient free space in `/usr/openv`, `/tmp`, and other relevant partitions.
5. Name Resolution Loop / `bpcd` Issues
Sometimes, the client itself might struggle with its own name resolution or the `bpcd` daemon gets stuck.
- Symptom: `bptestbpcd` from client to client or client to master fails, even if basic ping works. Logs show `host not found` or similar.
- Troubleshooting:
- Restart NetBackup services (`bp.kill_all` then `bp.start_all`).
- Clear NetBackup host cache on the client if it exists.
- Ensure `/etc/nsswitch.conf` is configured correctly (e.g., `hosts: files dns`).
- Check for multiple network interfaces on the client; ensure NetBackup binds to the correct one or is configured to use a specific IP/hostname.
Integrating NetBackup into Your DevOps Workflow
As a DevOps engineer, simply installing a client manually isn't enough. We thrive on automation, consistency, and repeatability. While the video focuses on a manual installation, let's think about how this fits into a broader DevOps philosophy.
Automation for Client Deployment
Imagine managing hundreds or thousands of Linux servers. Manually installing the NetBackup client on each one is a nightmare. This is where Infrastructure as Code (IaC) and configuration management tools shine.
- Ansible: You can create an Ansible playbook to automate the entire client installation process.
- Download the client package to a central repository.
- Transfer it to target servers.
- Extract the package.
- Run the `install` script, providing answers to prompts using `expect` module or an answer file for silent installations.
- Configure `/etc/hosts` and firewall rules.
- Verify service status.
This ensures consistent installations across your fleet and reduces human error.
- Puppet/Chef/SaltStack: Similar approaches can be used with these tools to define the desired state of your NetBackup clients.
Monitoring and Alerting
A DevOps mindset extends beyond deployment. You need to know if your backups are actually working.
- Integrate NetBackup job status into your central monitoring system (Prometheus, Nagios, Splunk).
- Set up alerts for failed backup jobs, client communication errors, or critical service outages on the client.
- Monitor disk space on client servers to prevent backup failures due to lack of temporary space.
Security Best Practices for NetBackup Clients
Data protection is intertwined with data security. When deploying NetBackup clients, always consider these:
- Least Privilege: Ensure the NetBackup client processes run with the minimum necessary privileges.
- Firewall Hardening: Only open the absolutely required ports (1556, 13724) on the client to your Master and Media servers. Restrict source IPs if possible.
- Secure Communication: NetBackup typically uses secure communication channels. Ensure these are configured and TLS/SSL certificates are properly managed, especially in newer versions.
- Regular Patching: Keep your NetBackup client software (and the underlying OS) patched to protect against known vulnerabilities.
- Audit Logs: Regularly review NetBackup logs on the client and Master Server for any suspicious activity.
By thinking about NetBackup client deployment and management through a DevOps lens, you move from reactive troubleshooting to proactive, scalable, and secure data protection practices. This is where a senior engineer really adds value, thinking beyond the command line, bhai!
Key Takeaways
- NetBackup client installation on Linux is fundamental for enterprise data protection, enabling centralized backup and recovery for critical Linux servers.
- Thorough pre-installation checks (OS compatibility, network resolution, firewall rules, root access) are crucial to prevent common installation and connectivity issues.
- The installation process involves extracting the client package, running the `install` script, and providing the Master Server hostname and client name accurately.
- Post-installation verification includes checking NetBackup daemon status, testing connectivity with `bptestbpcd`, and confirming client registration on the Master Server.
- Common troubleshooting areas include name resolution, firewall blockage, incorrect configuration in `bp.conf`, and ensuring proper NetBackup service operation.
- Integrating NetBackup client deployment with DevOps practices like automation (Ansible, Puppet) and robust monitoring enhances efficiency, consistency, and security for large-scale environments.
Frequently Asked Questions
What is the primary function of the NetBackup client on a Linux server?
The NetBackup client acts as an agent on the Linux server, enabling it to communicate with the NetBackup Master and Media Servers. Its primary function is to facilitate the backup of data from the Linux server to the NetBackup storage infrastructure and to enable restoration of that data when needed. It's the essential component that makes the Linux server "visible" and manageable by NetBackup.
What are the critical ports that need to be open for NetBackup client-server communication on Linux?
The two most critical ports for NetBackup client-server communication are 1556/TCP for the `bpcd` (NetBackup Client Daemon) process and 13724/TCP for the `vnetd` (Veritas Network Daemon) process. Port 13782/TCP for PBX (Private Branch Exchange) is also frequently used. These ports must be open bi-directionally between the Linux client and the NetBackup Master/Media Servers for proper communication and backup operations.
How can I verify if the NetBackup client is properly installed and communicating with the Master Server?
After installation, you can verify by checking if NetBackup processes like `bpcd` and `vnetd` are running on the client (ps -ef | grep bp). Crucially, use the `bptestbpcd` command from the client to test connectivity to the Master Server: /usr/openv/netbackup/bin/bptestbpcd -client your_client_hostname -host your_master_server_hostname -verbose. A successful output will show connections to `vnetd` and `bpcd` on the Master Server, confirming basic communication. Finally, check the NetBackup Administration Console on the Master Server to ensure the client appears and is ready for policy assignment.
What should I check if NetBackup client installation fails with "host unknown" errors?
"Host unknown" errors almost always point to a name resolution issue. First, check the `/etc/hosts` file on both the client and the Master Server to ensure correct hostname-to-IP mappings for both machines. Second, verify DNS resolution using `ping` and `nslookup` commands from both the client to the Master Server, and the Master Server to the client. Ensure both forward and reverse lookups work correctly. Third, double-check that firewalls are not blocking DNS traffic or the NetBackup communication ports (1556, 13724).
So, there you have it, boss. A comprehensive walkthrough on Net Backup 7.5 client installation on Linux. Remember, the key is attention to detail, understanding the 'why' behind each step, and not being afraid to dive into those log files when things go sideways. If you want to see this process in action, don't forget to watch the original video on @explorenystream and subscribe for more informative content. Keep learning, keep automating!