
Net Backup 7 5 media server installation on linux Information & Technology
July 23, 2026 — LiveStream
▶ Net Backup 7 5 media server installation on linux Information & Technology | Subscribe to @explorenystream
Setting up a robust enterprise backup solution on Linux is a foundational task for any DevOps or system administration team, and this guide provides a deep dive into the Net Backup 7.5 media server installation on Linux, a critical component for effective data protection.
This comprehensive article will walk you through the architecture, prerequisites, step-by-step installation, and essential post-configuration for your Veritas NetBackup 7.5 media server, ensuring your data is secure and recoverable.
Understanding Veritas NetBackup 7.5 Architecture: The Media Server's Role
Achha, junior, baitho. Chai peete hain aur NetBackup 7.5 ke architecture ko thoda samajhte hain. Jab hum enterprise data protection ki baat karte hain, NetBackup kaafi prevalent solution hai. Iske core mein teen main components hote hain: The Master Server, The Media Server, aur The Client. Ab humara focus hai Media Server pe, especially Net Backup 7.5 media server installation on Linux. Dekho, Master Server toh brain hai, saare policies, schedules, aur backup metadata wahi manage karta hai. Clients are jahan se actual data uthana hai, like your application servers, databases, virtual machines, etc.
Toh phir Media Server kya karta hai? Media Server ekdum data mover hai, apna muscleman. Yeh woh server hai jo actual backup data ko client se leta hai aur phir usko storage par likhta hai – be it disk storage units (DSUs), tape libraries, ya phir deduplication pools. Master Server bas usko order deta hai ki "bhai, iss client ka data utha aur usko uss storage pe rakh." Aur Media Server wahi kaam karta hai. Iska primary role data transfer aur storage management hai. Jitne bhi backup aur restore operations hote hain, unka data flow Media Server ke through hi hota hai.
NetBackup 7.5 ke context mein, Media Server ki importance aur bhi badh jaati hai. Yeh sirf data transfer tak seemit nahi hai; yeh deduplication bhi perform kar sakta hai agar aap Media Server Deduplication Pool (MSDP) configure karte ho. Imagine karo, agar aapke paas 100 clients hain aur sabka data seedha Master Server pe jaaye, toh Master Server toh ekdum choke ho jaayega, right? Isliye, Media Servers scalability provide karte hain. Aap multiple Media Servers deploy kar sakte ho across your data center to handle different workloads, different storage types, aur different network segments.
Why Linux for a Media Server, you might ask? Kaafi achha sawaal hai. Historically, NetBackup servers have run on both Windows and various Unix/Linux distributions. But for a Media Server, Linux offers several compelling advantages. First, stability and performance. Linux kernels are known for their robustness and efficiency, especially under heavy I/O loads, which is exactly what a Media Server experiences. Second, cost-effectiveness. Open-source nature of Linux means lower licensing costs compared to proprietary OS. Third, security. Linux provides a strong foundation for security, which is paramount for any critical infrastructure component like a backup server. Plus, most DevOps and sysadmin teams are already comfortable with Linux, making management and automation easier. Toh, Net Backup 7.5 media server installation on Linux is not just a choice; it's often a strategic advantage for enterprise environments. It provides a reliable and performant backbone for your data protection strategy, offloading the heavy lifting from your Master Server and optimizing your backup windows. Always remember, the Media Server is where the rubber meets the road for your backup jobs.
Pre-Installation Checklist: Getting Your Linux Box Ready for NetBackup 7.5
Acha, ab jab NetBackup Media Server ka role samajh aa gaya, toh next step hai uski तैयारी. Dekho, koi bhi software installation, khaas kar enterprise level ka, aise hi shuru nahi karte. Pehle poora homework karna padta hai. For Net Backup 7.5 media server installation on Linux, your Linux box needs to be prim-n-proper. Yeh pre-installation checklist ekdum crucial hai, junior. Isko follow nahi kiya toh installation fail ho sakta hai ya fir future mein kaafi headaches milengi.
1. Hardware Requirements: The Foundation
- CPU: Minimum 2 CPUs (cores) toh chahiye hi. Agar deduplication ya kaafi high concurrent jobs hain, toh 4 ya usse zyada better performance denge.
- RAM: 4GB RAM minimum hai, but for production systems, especially with MSDP, 8GB ya usse zyada recommended hai. MSDP ke liye memory kaafi important hai for hash caching.
- Disk Space: Yeh kaafi important hai.
- OS Disk: OS ke liye enough space, usually 50-100GB.
- NetBackup Binaries:
/usr/openvpartition ke liye 10-20GB. - Log Files:
/usr/openv/netbackup/logsand/usr/openv/logske liye separate partition banalo aur at least 5-10GB dedo, taaki root partition fill na ho. - Storage Unit Data: Yeh Media Server ka main kaam hai. Agar aap AdvancedDisk ya MSDP use kar rahe ho, toh iske liye kaafi zyada space chahiye. This is where your actual backup data resides. Plan for TBs of storage, depending on your data retention and volume.
2. Software Requirements: The Right Environment
- Operating System: NetBackup 7.5 supports specific Linux distributions and versions. Generally, Red Hat Enterprise Linux (RHEL) 5.x or 6.x, and SUSE Linux Enterprise Server (SLES) 10.x or 11.x were supported. Make sure your chosen Linux version is compatible. Always check the official Veritas Hardware and Software Compatibility List (HSCL) for exact details.
- Kernel: Ensure your kernel version is supported. Sometimes minor kernel updates can cause issues.
- Required Packages: Yeh important hai, bhai. NetBackup ko kuch dependencies chahiye hoti hain. Common ones include:
compat-libstdc++-33(for older C++ libraries)libaio(for asynchronous I/O performance)libstdc++- Other standard development libraries.
yum installyazypper installse install kar sakte ho. Sometimes the installer might tell you, but it's better to be proactive. - Java: NetBackup components often rely on Java. Make sure a compatible Java Runtime Environment (JRE) is available or gets installed with NetBackup.
3. Network Configuration: Connectivity is King
- Hostname: Make sure your Linux server has a unique and resolvable hostname.
- IP Address: Static IP address hona chahiye.
- DNS Resolution: Yeh ekdum critical hai. Media Server ko Master Server aur Clients ka hostname resolve karna aana chahiye, aur Master Server aur Clients ko Media Server ka. Both forward and reverse DNS resolution should work perfectly. Test it using
pingandnslookup. - Firewall Rules: Default firewall (e.g.,
firewalldoriptables) ya security group rules (if it's a VM) ko configure karna padega. NetBackup uses specific ports for communication:- 1556 (vnetd): Primary NetBackup communication port.
- 13724 (bpcd): For client-side operations.
- 13782 (nbemm): For Enterprise Media Manager.
- Aur bhi ports ho sakte hain depending on components (e.g., vmd for Media Manager). Make sure these are open between Master, Media, and Clients.
4. User & Group Setup: Permissions Matter
- NetBackup typically runs as `root` for installation, but its services use specific user/group contexts. It usually creates its own accounts like `nbwebgrp`. Ensure proper permissions for the installation directories.
5. File System Preparation: Where Everything Sits
- Properly partitioned disks. As discussed in hardware, dedicate mount points for NetBackup binaries, logs, and most importantly, backup data. Using LVM (Logical Volume Manager) is a good practice for flexibility in resizing.
6. Miscellaneous but Important:
- Time Synchronization: NTP client chalna chahiye. All NetBackup servers and clients must be time-synchronized. Time skew can cause backup failures and communication issues.
- SELinux/AppArmor: If enabled, they can block NetBackup operations. Temporarily disable them (
setenforce 0) during installation or ensure you have appropriate policies configured. For production, it's better to configure SELinux policies for NetBackup rather than disabling it permanently. - Licensing: Make sure you have your NetBackup 7.5 license keys handy. You'll need them post-installation.
- Installation Media: Downloaded NetBackup 7.5 ISO or tarball ready and accessible.
Once you've ticked off everything on this list, you're in a solid position to proceed with the actual Net Backup 7.5 media server installation on Linux. Remember, junior, planning makes perfect, especially in DevOps. Mastering NetBackup Master Server Best Practices is equally important for a robust setup.
Step-by-Step Guide: Net Backup 7.5 Media Server Installation on Linux
Theek hai, junior, ab jab saari prerequisites done hain, toh actual installation process pe chalte hain. Net Backup 7.5 media server installation on Linux is a pretty straightforward process if you've done your homework right. Main tumhe step-by-step batata hoon, bilkul praktikal tarike se. Yeh ek interactive installer hai, toh dhyan se prompts ko follow karna.
1. Prepare the Installation Media
Pehla kaam hai installation files ko access karna. Assuming you have the NetBackup 7.5 ISO image or a tarball downloaded:
Option A: Mounting an ISO Image
sudo mkdir -p /mnt/nb75
sudo mount -o loop NetBackup_7.5_Linux.iso /mnt/nb75
cd /mnt/nb75/Linux
Replace `NetBackup_7.5_Linux.iso` with your actual ISO filename. Agar multiple OS platforms ki directories hain (e.g., `Linux`, `Solaris`), toh `Linux` wali directory mein jaana.
Option B: Extracting a Tarball
mkdir -p /opt/nb75_install
tar -xvf NetBackup_7.5_Linux.tar.gz -C /opt/nb75_install
cd /opt/nb75_install/NetBackup_7.5_Linux/Linux # Path might vary slightly
Ensure you are in the directory containing the `install` script.
2. Run the Installer Script
Ab main installation script chalate hain. Make sure you have `root` privileges.
sudo ./installThe installer will start. Pehle woh Veritas ke welcome message dikhayega aur kuch basic system checks karega.
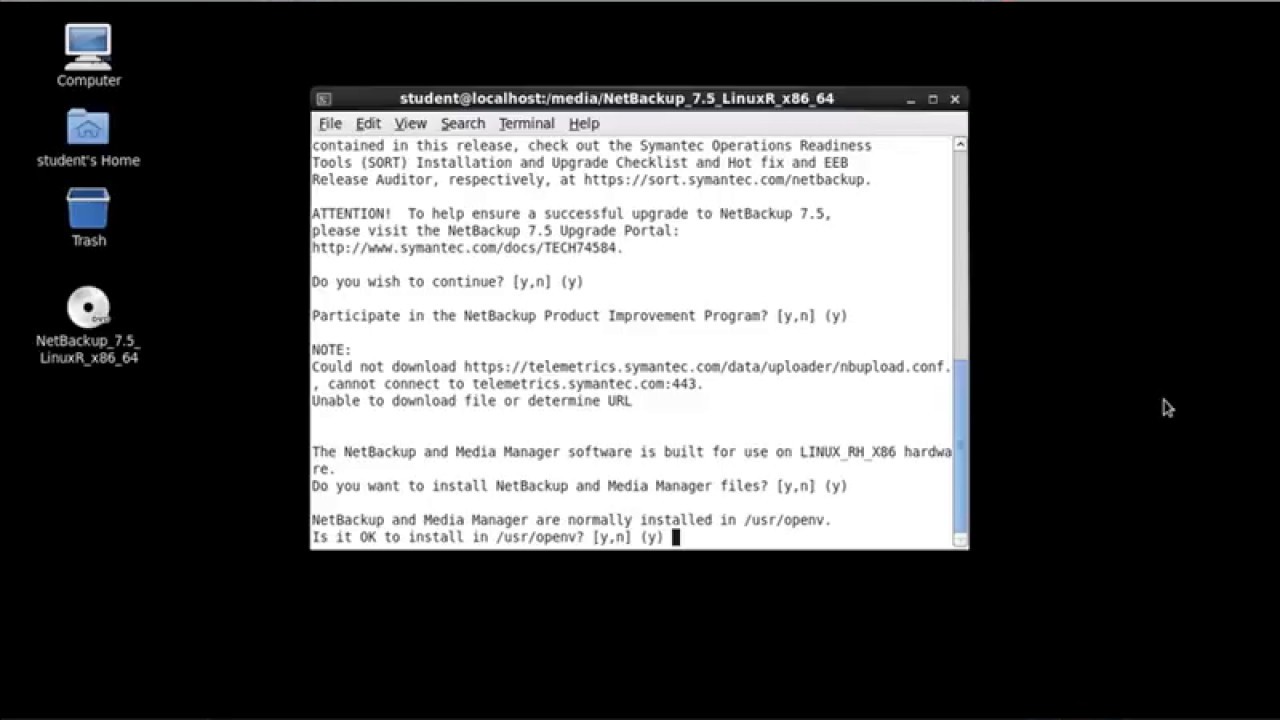
3. Follow the Interactive Prompts: The Installation Wizard
This is where you need to pay close attention. The installer will guide you through several screens:
a. Welcome Screen & Language Selection: Just hit Enter. Choose your preferred language if prompted.
b. License Agreement: You'll see the Veritas End User License Agreement (EULA). Read it (ya fir at least scroll down) and type `yes` to accept. Agar no bola toh installation cancel ho jayegi, obviously.
c. Installation Type Selection: This is crucial.
- You'll be asked to choose between Master Server, Media Server, or Client.
- Select the option for Media Server installation.
d. Specify Master Server Details: Since this is a Media Server, it needs to know which Master Server it will report to.
- Enter the hostname or IP address of your NetBackup Master Server. Ensure this hostname is resolvable via DNS from your Media Server.
- The installer might ask for a password for secure communication; if so, provide it.
e. Installation Path: The default installation path for NetBackup is usually `/usr/openv`. It's generally a good idea to stick to the default unless you have a very specific reason not to. Press Enter to accept.
f. Pre-installation Checks: The installer will perform some system checks to verify if your Linux server meets basic requirements (e.g., enough disk space, kernel version, presence of necessary packages).
- Pay attention to any warnings or errors here. If there are errors, resolve them before proceeding. Sometimes, it might prompt you to install missing libraries.
- Agar koi warning hai, jaise ki "SELinux is enabled," toh usko note down karlo. Jaise maine pehle bataya, SELinux policies adjust karni padengi.
g. Review and Confirm: The installer will present a summary of your choices. Review everything carefully, especially the Master Server name and installation type. If everything looks correct, confirm to start the installation.
h. Installation Progress: The installer will now copy files and configure NetBackup services. This can take some time, depending on your system's performance. You'll see progress messages on the console.
i. Installation Complete: Once done, you'll see a confirmation message. It usually provides a log file location where you can check for any specific issues. Don't forget to dismount the ISO if you mounted it earlier: `sudo umount /mnt/nb75`.
4. Initial Configuration and Verification
Installation complete ho gayi, but abhi kaam khatam nahi hua. Ab isko verify aur configure karna hai:
a. Check NetBackup Services: You can check if the NetBackup processes are running:
/usr/openv/netbackup/bin/bpps -x/usr/openv/netbackup/bin/bp.start_allb. Add License Keys: You need to add your NetBackup license keys to the Master Server, which will then propagate them to the Media Server. But sometimes, you might need to ensure they are visible on the Media Server too. The Master Server is where you manage licenses. On the Master Server (if not already done):
/usr/openv/netbackup/bin/admincmd/bpminlicense -add c. Verify Communication with Master Server: It's critical that the Media Server can communicate with the Master Server. Test this using:
/usr/openv/netbackup/bin/bptestbpcd -host d. Register Media Server with Master (if required): In some cases, or if you encounter issues, you might need to explicitly register the media server with the Master's EMM database. This is usually done automatically during installation but can be checked via the NetBackup Administration Console on the Master Server.
Shaabaash, junior! Your Net Backup 7.5 media server installation on Linux is now complete. But this is just the beginning. The real work, configuration, aur fine-tuning, ab shuru hoga. Optimizing NetBackup Performance requires continuous monitoring and adjustments.
Post-Installation & Configuration Best Practices for NetBackup 7.5 Media Servers
Installation toh ho gayi, ekdum badhiya. Ab asli engineering yahan se shuru hoti hai, junior. Sirf install karna kaafi nahi hai; usko properly configure karna, tune karna, aur best practices follow karna zaroori hai for Net Backup 7.5 media server installation on Linux. Warna saare efforts waste ho sakte hain, aur backups fail honge ya performance low rahegi.
1. Storage Unit Configuration: The Data Destination
Media Server ka main kaam hai data ko storage pe likhna. Toh sabse pehle, humein storage units define karne honge. NetBackup 7.5 mein kaafi storage types supported the:
- AdvancedDisk (AD): Yeh kaafi popular hai. Basically, yeh disk storage units hain jo Media Server pe attached disk volumes use karte hain.
- Disk Pool Creation: Master Server console se, aap Disk Pools create karoge. Isme aap specify karoge ki Media Server kaunse local disk paths (mount points) ko use karega for storing backup data.
Phir Master Server pe GUI ya command line (`nbdevconfig`) se Disk Pool create karo.# Example: Create a directory for AdvancedDisk sudo mkdir -p /mnt/backups/advdisk01 sudo chown nbwebgrp:nbwebgrp /mnt/backups/advdisk01 # Ensure proper permissions - Storage Unit (STU) Creation: Disk Pool banne ke baad, uske upar aap Storage Units create karte ho. Jab policies banaoge toh unmein yahi STUs specify karoge.
- Disk Pool Creation: Master Server console se, aap Disk Pools create karoge. Isme aap specify karoge ki Media Server kaunse local disk paths (mount points) ko use karega for storing backup data.
- Media Server Deduplication Pool (MSDP): Yeh kaafi important feature tha 7.x series mein. MSDP allows the Media Server to perform source-side or target-side data deduplication.
- Sizing: MSDP ke liye separate, high-performance disk storage chahiye. Iski sizing kaafi critical hai (disk space, memory for fingerprint cache, CPU).
- Configuration: MSDP ko bhi Master Server console se configure kiya jaata hai, specifying the Media Server and the disk paths for the deduplication store.
- Performance: MSDP performance ke liye Fast I/O disks (SSD preferred for fingerprint DB) aur kaafi RAM required hai.
- Tape Libraries: Agar aap tape storage use kar rahe ho, toh Media Server ko tape drives aur robotics configure karne honge. Iske liye zoning, device drivers, aur NetBackup media manager configuration required hota hai.
2. Policy Creation: Tying It All Together
Ek baar Media Server aur Storage Units ready ho gaye, toh ab Master Server pe policies banani padengi. Jab aap backup policy banaoge, toh wahan aap specify karoge ki kaunsa client data, kaunse Media Server ke through, kaunse Storage Unit mein backup hoga. This is where your Media Server gets utilized.
3. Client Communication: The Data Flow
Make sure all your clients can reach the newly configured Media Server. Firewall rules, DNS resolution — yeh sab ekdum top-notch hona chahiye. Clients often prefer a specific Media Server based on network proximity or specific configurations. This is handled by policy settings and NetBackup's load balancing logic.
4. Performance Tuning: Optimizing the Engine
NetBackup performance ko tune karna ek ongoing process hai. Kuch key areas for Media Servers:
bp.confParameters: On the Media Server, the `bp.conf` file (located in `/usr/openv/netbackup/bp.conf`) contains various configuration parameters.BUFFER_SIZE: Adjusting this can impact backup/restore speeds. Experiment with values like 262144 (256KB), 524288 (512KB), ya 1048576 (1MB).NUMBER_DATA_BUFFERS: Kitne buffers simultaneously use honge.MAX_CONCURRENCY: How many concurrent jobs the Media Server can handle. Be careful not to overload it.
- Disk I/O: Ensure the underlying storage for your Storage Units has high I/O throughput. If using virtual disks, ensure the hypervisor is not oversubscribed.
- Network Bandwidth: Media Server ka network interface poora bandwidth use kar paaye, yeh ensure karo. Check for bottlenecks.
5. Monitoring & Logging: Keeping an Eye on Things
Continuous monitoring crucial hai. NetBackup generates a lot of logs.
- Log Files: NetBackup ke logs usually `/usr/openv/netbackup/logs/` mein milenge, aur specific daemon logs ke liye directories hongi (e.g., `bptm`, `bpdm`, `bpcd`). Veritas Unified Logging (`vxlog`) bhi hota hai, jiske logs `/usr/openv/logs/` mein hote hain.
vxlogview: Use this command to view unified logs./usr/openv/netbackup/bin/vxlogview -p 50936 -o 137 -t 00:30:00 # View logs for process 137 from 50936 for last 30 mins- `bperror` command: Helps decode NetBackup error codes.
- Monitoring Tools: Integrate NetBackup with your enterprise monitoring solution (e.g., Nagios, Prometheus, Splunk) to track job status, storage usage, and component health.
6. Troubleshooting Common Issues: Being Prepared
Kuch common issues jo tum face kar sakte ho:
- Connectivity Issues: Check DNS, firewalls, and `bptestbpcd` command from both Master to Media and Media to Master.
- Permissions: Ensure NetBackup processes have correct permissions to access storage paths.
- Resource Exhaustion: Insufficient CPU, RAM, or disk I/O can cause backups to slow down or fail. Monitor `top`, `iostat`, `vmstat`.
- Name Resolution Issues: `ping -a
` for reverse lookup, `ping ` for forward lookup. `/etc/hosts` entries can be a temporary fix but DNS is preferred.
7. Security: Protecting Your Backups
- OS Hardening: Keep your Linux OS patched and hardened. Disable unnecessary services.
- NetBackup Access Control (NBAC): NetBackup 7.5 mein NBAC tha, jo role-based access control provide karta hai. Configure it properly to restrict who can perform what actions on the Media Server and Master.
- Data Encryption: Consider configuring data encryption for backups, either at rest (disk encryption) or in-flight (NetBackup's built-in encryption).
Junior, yeh sab best practices follow karna tumhe ekdum solid NetBackup Media Server setup dega. It's about being proactive and understanding the entire ecosystem, not just the installation. Integrating NetBackup with Tape Libraries is another advanced topic you'll eventually need to master.
Key Takeaways
- The NetBackup Media Server is the data mover in the NetBackup architecture, responsible for transferring backup data from clients to storage and managing storage resources.
- Proper pre-installation planning for Net Backup 7.5 media server installation on Linux is critical, covering hardware, software dependencies, network configuration, and file system preparation.
- The installation process on Linux is interactive and guided, requiring careful attention to prompts like selecting the Media Server role and specifying the Master Server.
- Post-installation configuration involves setting up storage units (AdvancedDisk, MSDP, Tape), integrating the Media Server into backup policies, and ensuring robust client communication.
- Performance tuning, continuous monitoring via logs, and adherence to security best practices are essential for a reliable and efficient NetBackup 7.5 Media Server in a production environment.
Frequently Asked Questions
What is a NetBackup media server and why is it important?
A NetBackup Media Server acts as the intermediary between clients (data sources) and backup storage. It receives data from clients and writes it to disk, tape, or deduplication pools. It's crucial because it offloads the data transfer burden from the Master Server, enabling scalability, better performance, and efficient management of diverse storage types in an enterprise backup environment.
What are the minimum requirements for NetBackup 7.5 Media Server on Linux?
For NetBackup 7.5 Media Server on Linux, you typically need a minimum of 2 CPU cores, 4GB RAM (more for MSDP), and sufficient disk space for the OS, NetBackup binaries (~20GB), logs, and TBs for backup data. It requires specific Linux distributions like RHEL 5.x/6.x or SLES 10.x/11.x, along with necessary packages like `compat-libstdc++-33` and `libaio`, and proper DNS and firewall configurations.
How do I troubleshoot NetBackup communication issues between Master and Media Servers?
To troubleshoot communication issues, first verify DNS resolution (forward and reverse) for both servers using `ping` and `nslookup`. Next, check firewall rules to ensure NetBackup ports (1556, 13724, 13782) are open. Use the `bptestbpcd -host
Can I upgrade NetBackup 7.5 directly to the latest version?
Generally, direct upgrades from a version as old as NetBackup 7.5 to the absolute latest version are not supported. Veritas usually recommends a staged upgrade path, where you might need to upgrade to an intermediate version (e.g., 7.x to 8.x, then 8.x to 9.x, and so on) before reaching the current latest release. Always consult the official Veritas upgrade guides and compatibility lists for the precise upgrade matrix and supported paths.
I hope this deep dive into Net Backup 7.5 media server installation on Linux was helpful, junior! If you want to see these steps in action, I highly recommend watching the detailed video by @explorenystream. Don't forget to subscribe to their channel for more awesome tech content!